Flutter’da Form Doğrulamayı Öğrenirken Neler Keşfettim?


Merhaba Flutter Geliştiricileri 👊 Bugün Flutter ile bir uygulama geliştirirken yaşadığım bir şeyden bahsetmek istiyorum. Kendi Flutter projemi geliştirirken, kullanıcı girişlerini doğrulamanın ne kadar önemli olduğunu fark ettim. Doğrulama olmadan kullanıcılar her türlü veriyi girebiliyor ve bu da hatalara, hatta uygulamanın çökmesine sebep olabiliyor. Uygulamamın güvenli bir şekilde çalışması için Flutter’ın doğrulama araçlarını araştırdım. İşte bu süreçte öğrendiklerim ve form doğrulamayı kolayca kurmanız için birkaç pratik ipucu!

Basit Bir Form Oluşturma

İlk olarak Flutter’da Form widget'ını kullanarak basit bir form düzeni oluşturdum. Bu widget tüm giriş alanlarını bir araya getiriyor ve bunları tek seferde doğrulamama olanak tanıyor. İşte benim kullandığım düzen:

final GlobalKey<FormState> _formKey = GlobalKey<FormState>();

Scaffold(
backgroundColor: Colors.blueAccent[100],
body: Padding(
padding: EdgeInsets.all(12.0),
child: Form(
key: _formKey, // forma özel bir anahtar
child: Column(
children: <Widget>[
TextFormField(
decoration: InputDecoration(labelText: 'Email'),
),
TextFormField(
decoration: InputDecoration(labelText: 'Password'),
obscureText: true, // Şifreyi gizlemek için
),
SizedBox(height: 10),
ElevatedButton(
onPressed: _submitForm,
child: Text('Submit'),
),
],
),
),
),
),


Form widget'ı, formun durumunu izlemek için bir GlobalKey gerektiriyor. validate() gibi fonksiyonları kullanarak her şeyin doğru şekilde doldurulup doldurulmadığını bu anahtar sayesinde kontrol edebiliyorum.

Doğrulama Kuralları Ekleme: E-posta ve Şifre

Sırada, özellikle e-posta ve şifre alanları için doğrulama kuralları tanımlamak var. Bu alanların geçerli bilgi içerdiğinden emin olmak için her TextFormField'e bir validator fonksiyonu ekledim.

İşte e-posta ve şifre için doğrulama kurallarım:

TextFormField(
decoration: InputDecoration(labelText: 'Email'),
validator: (value) {
if (value == null || value.isEmpty) {
return 'Please enter your email';
} else if (!RegExp(r'^[^@]+@[^@]+\.[^@]+').hasMatch(value)) {
return 'Enter a valid email';
}
return null;
},
),
TextFormField(
decoration: InputDecoration(labelText: 'Password'),
obscureText: true,
validator: (value) {
if (value == null || value.isEmpty) {
return 'Please enter your password';
} else if (value.length < 6) {
return 'Password must be at least 6 characters';
}
return null;
},
),

Açık ve anlaşılır hata mesajlarının büyük fark yarattığını gördüm. Belirsiz uyarılar yerine, kullanıcılara neyi düzeltmeleri gerektiğini net bir şekilde anlatmak işlerini kolaylaştırdı.

Formu Gönderme ve Geçerlilik Kontrolü

Kullanıcı gönder düğmesine tıkladığında, tüm doğrulamaların aynı anda kontrol edilmesini istedim. Bunun için _formKey.currentState!.validate()fonksiyonunu kullandım. Bu fonksiyon her alanı kontrol eder, validator’ları çalıştırır ve yalnızca tüm alanlar geçerliyse formu gönderir.

Gönderme fonksiyonumu şöyle yazdım:

void _submitForm() {
if (_formKey.currentState!.validate()) {
print('Form is valid');
// Process data or navigate to the next screen
} else {
print('Form is not valid');
}
}

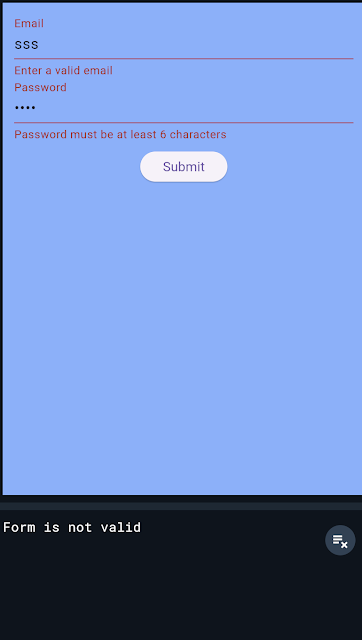
Ve sonuç şu şekilde:


validate() fonksiyonunu kullanmak oldukça pratik; eğer herhangi bir alan geçersizse formu göndermeyi engelliyor. Ayrıca, dikkat edilmesi gereken alanları da vurguluyor ki bu kullanıcılar için oldukça yararlı.

Birkaç ipucu:

  • Samimi hata mesajları çok etkili! Test ettiğimde, kullanıcıların daha net talimatlar aldıklarında daha iyi yanıt verdiğini fark ettim.
  • E-posta doğrulaması için kullanıcı girişinin doğru formatta olup olmadığını anlamak için bir regular expression (Regex) kullandım. E-posta, telefon numarası gibi belirli bir format gerektiren alanlarda Regex öneririm.
  • Bazı uygulamalar kullanıcı yazarken doğrulama yapar, bu da kullanıcıya anında geri bildirim verir. Bu projede TextEditingControllerkullanmadım, ama bu özelliği büyük formlar için düşünebilirim.
  • Daha fazla alan veya karmaşık kuralları olan formlar için flutter_form_builder gibi paketler zaman kazandırabilir. Bu projede gerek duymadım ama daha büyük formlar üzerinde çalışırken keşfetmeye değer.

Flutter’da doğrulama ayarlamayı öğrenmek projem için bir dönüm noktası oldu. Uygulamamı daha güvenilir ve kullanıcı dostu hale getirdi, ayrıca formları nasıl yönetebileceğimi anlamama yardımcı oldu. Doğrulamaya yeni başlıyorsanız, temel konularla başlayın ve kullanıcı deneyimini iyileştirmek için hata mesajlarını özelleştirmekten çekinmeyin.

Doğrulama ilk başta zor gibi görünebilir, ancak güvenilir bir uygulama oluşturmak için öğrenmeye kesinlikle değer. Kendi Flutter formlarınızda başarılar dilerim!

Okuduğunuz için teşekkürler.

Selin.

My Application Development Process with Flutter: How Did I Go From Zero to Broadcast?


My journey into the world of mobile app development actually started with a great discovery: Flutter. At first, I set out thinking, “What can I do with such a popular framework?”. Today, I have several apps both published and in development. In this article, I would like to share with you my process of developing a Flutter app from scratch and what I experienced during this process. Especially my English teaching app for children was a big turning point for me in this process. 

1. First Introducing Flutter: Why Flutter?

Flutter ile ilk tanıştığımda, mobil uygulama geliştirmeye oldukça yeniydim. When I first met Flutter, I was quite new to mobile app development. I had worked with languages like C# and SQL before, but the mobile world was an unknown area for me. As a result of my research, I learned that Flutter offers the opportunity to develop apps for both iOS and Android platforms with a single code base, which was a great advantage for beginners like me. Getting fast results and having the support of a large community played an important role in my choice of Flutter. 

2. My First Project: English Teaching Practice, Penguin Academy


My first project at Flutter was an app that aimed to teach English to children and have fun. The app aimed to teach words to children with simple visual cards and audio pronunciations. I had a lot of questions when I started this project: What kind of user interface should I design? How will I manage the data? But thanks to Flutter's extensive libraries and easy-to-use tools, I was able to move forward step by step. 

The biggest challenge I faced during this process was dynamic data management. Categorized word cards and audio files were central to the application. It took me a while to figure out data management with Flutter's widgets like ListView and GridView. But in the end, I created an interface that was both performant and user-friendly. 

3. Preparation for Publication: Installing Apps on Google Play

After developing the app, it was time to get it ready for release. At first, I had no idea how to upload the app to the Google Play Store. But step by step, I packaged and uploaded the app on my husband's Google Play developer account, and learned a few things along the way:  

  • App Icon and Promotional Images: Visuals are very important to attract users' attention on Google Play. I prepared professional looking icons and screenshots.
  • App Description: It is very important to explain what the app does in a simple but impressive language. Here, I made it clear which features users will benefit from.

After these steps, my app is finally live! The excitement of releasing a mobile app for the first time was really indescribable. The initial feedback gave me a new perspective on the development of the app. 

And here is the result :

https://play.google.com/store/apps/details?id=com.cemnamak.flash_cards&pcampaignid=web_share

I would be very happy for your comments and feedback.

4. User Feedback and Improvements

After releasing it, I realized that the real work starts now. As users downloaded the app, feedback started coming in. In line with this feedback, I continuously updated the app. In particular, expanding the vocabulary categories and adding more sounds and visuals that would be interest to children was an important update step.

The next step was to add a stories section, where I wrote stories on topics of interest to children, supported them with visuals, and made adjustments such as screen orientation to ensure easy readability.

I also encountered performance issues - the dynamically loaded data could sometimes slow down the app. But thanks to Flutter's strong community and platforms like Stack Overflow, I had no trouble solving these problems.

5. Other Projects and Future Plans

After my English teaching app, I started working on new projects, one of which was a recipe app for babies. In this project, I used Flutter to design dynamic data loading and category-based browsers. This app is still in development and I plan to release it soon.

What I've learned on my app development journey with Flutter has taught me a lot, both technically and in terms of problem solving skills. Learning something new and improving myself in every project continues to motivate me.

I hope my Flutter journey will inspire those who are looking for direction. Thank you for reading this far. 

Don't forget to subscribe and leave your e-mail address to be informed about my new publications.

Thank you very much.

Selin.