Unity and UI Design


Hello, in this article, I would like to share information about how to prepare the user interface in Unity and what to pay attention to.

First of all, let’s talk a little bit about what is user interface (UI). UI is the main point where a game or an application interacts with the user and it has many important roles. One of them is usability. The UI allows users to easily understand and use a game or application and perform the functions they want quickly and smoothly. Another important point is first impression. A well-designed UI ensures that users have a favourable first impression when they start using our game. This, in turn, can greatly influence the likelihood of using our game again. And the last role is the understandability of the game. A game’s UI helps players understand the game mechanics and rules. In-game menus, indicators and controls make it easier for players to explore and interact with the game world.

For these reasons, it is very necessary to design our UI screen very well in order to make our game, which we have created with a lot of effort, shine even more and reach more users.

How to Create UI Screen in Unity?

To start UI design in Unity, we first need to create a Canvas. We can think of Canvas as a container that determines how your UI elements will be positioned on the stage.

As above, we create a Canvas by right clicking on the Hierarchy section in the Unity Editor and selecting “Canvas” under “UI”. Canvas is added with EventSystem. It is used to manage event components such as buttons and sliders that we will add on this canvas.

If we are going to develop our game in 3D, we need to click on the 2D button from above while making improvements on the canvas so that the canvas will appear in full screen. If we are developing a 2D game, there is no need for this since we are already viewing in 2D mode.
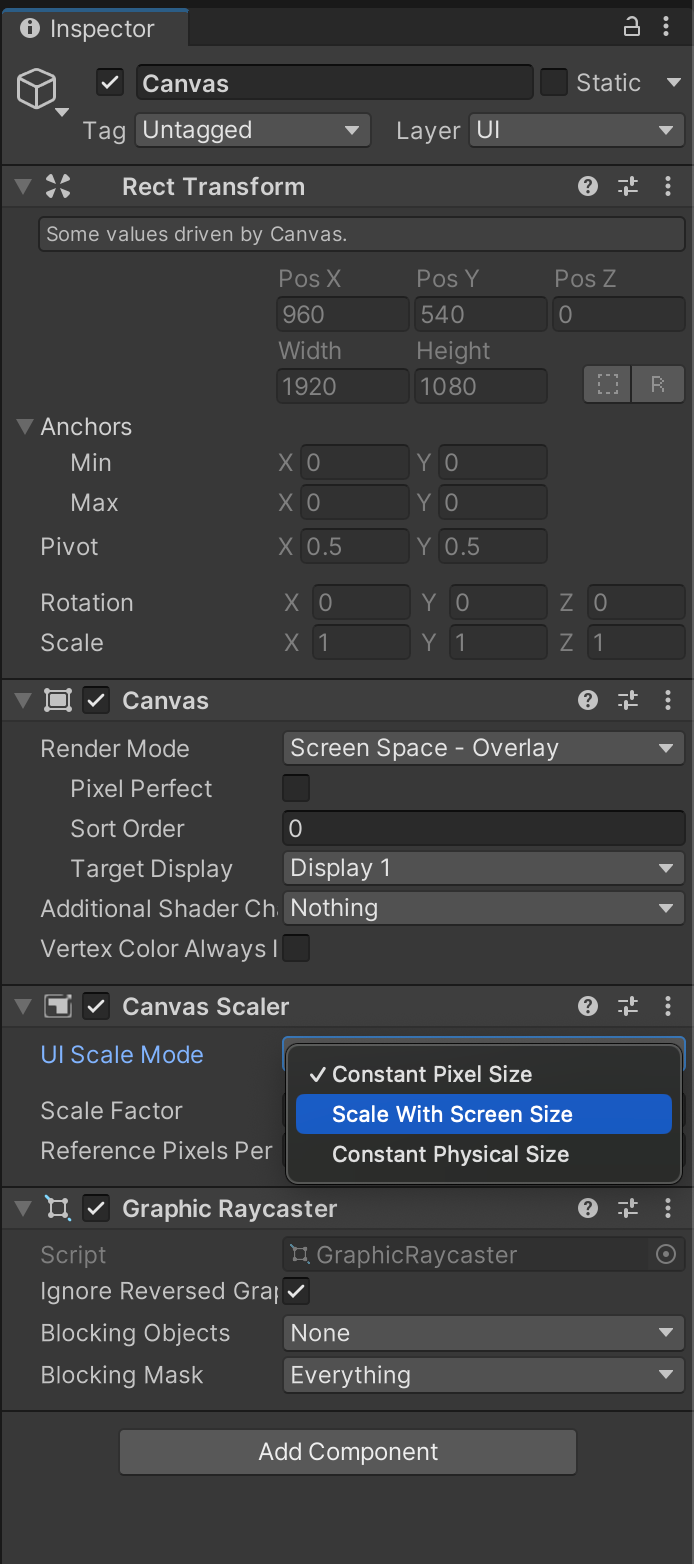
One of the most used properties in the standard Canvas Inspector is Scaler. With it, it is possible to automatically adapt UI elements to different screen sizes and resolutions. Constant Pixel Size ensures that the UI elements remain at a fixed pixel size so that the UI does not scale to different screen sizes. If we select Scale With Screen Size, UI elements are scaled according to the screen size. As the screen size increases or decreases, UI elements automatically adapt to the screen size.

UI Elements

After creating our canvas, we now have an image like this on our screen and we can design and fill it as we wish:
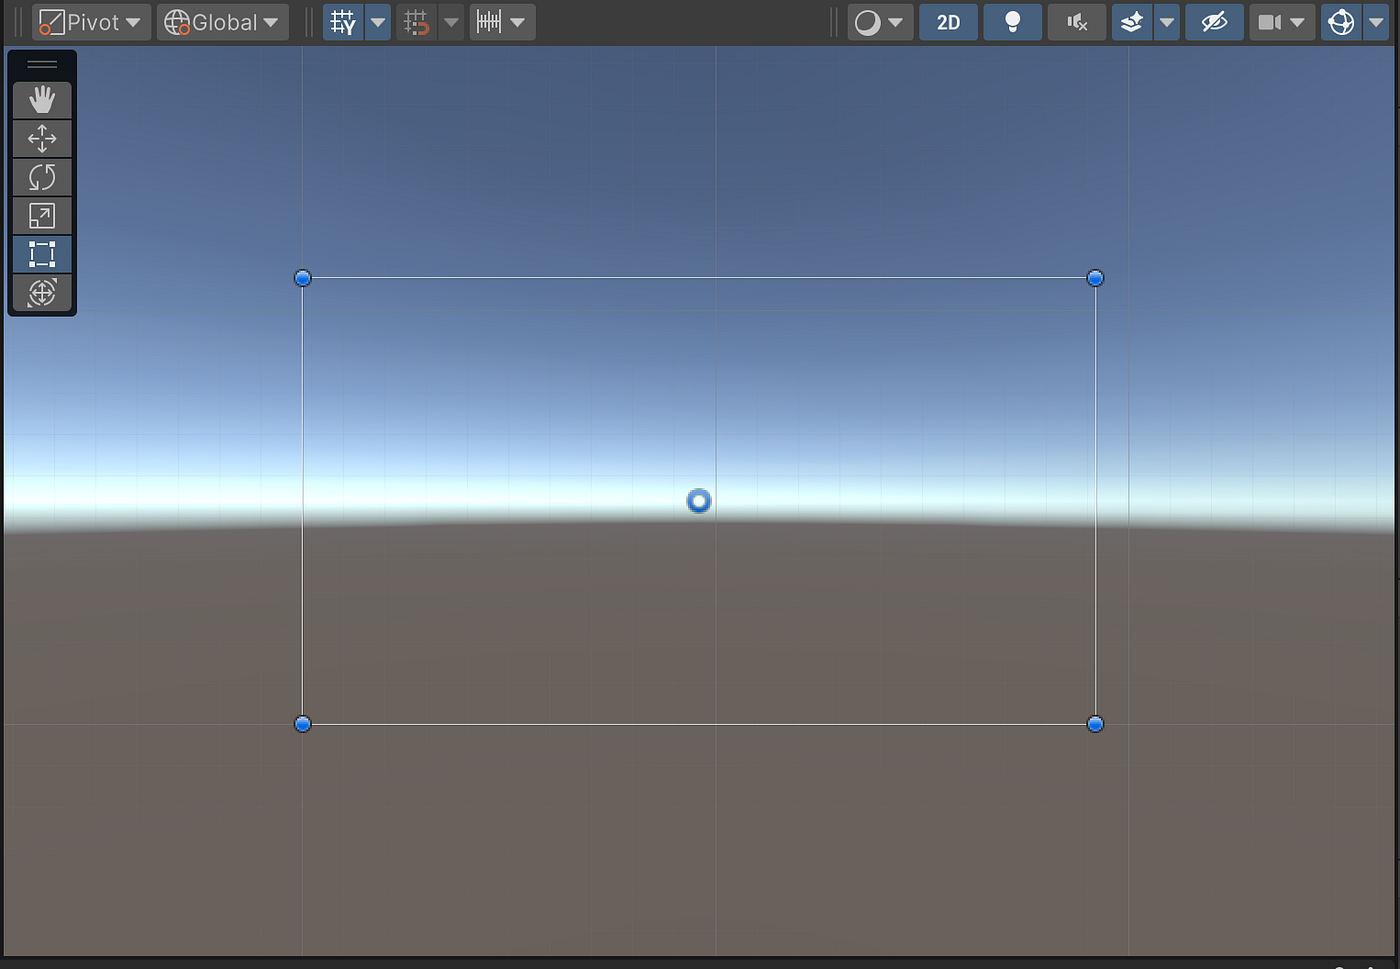
If we think of Canvas as a frame, let’s move on to the basic UI elements that can be added to this frame.

  1. Text: The Text element is used to display text on the screen. This is ideal for in-game messages, scores, game menu texts, etc. Properties such as colour, size, font, etc. can be customised.
  2. Image: The Image element is used to show visual content on the screen. This can be used for backgrounds, button icons, character portraits, etc. Properties such as texture, sprite, colour can be set. In order to add an image to the Canvas, the image file must be added to the project files. Afterwards, the image can be dragged to the Source Image section in the Inspector of the Image item or the file path can be written.
  3. Button: The button element is used for user interaction. It can be used to perform a specific action when users click it. Events can be assigned to be triggered when the button is pressed. Since text should be written on the button, it comes with the Text component. On Click() plugin is available by default. Which event will occur when the button is clicked is specified here by writing with Script.
  4. Input Field: The input field element allows the user to enter text. By default, it comes with a Text component and also a Placeholder where it can be specified what kind of information is desired. The expression to be written in this Text field can be for username and password fields, search boxes, form entries, etc.
  5. Slider: The slider element allows the user to select a value using a slider in a range of values. For example, it can be used for volume adjustment. Background, one of the components that comes by default, contains the properties related to the background of the slider bar. Fill Area contains properties that can be changed for the area where the value is increased when slid. Handle Slide contains properties related to the shape of the ball etc. used for scrolling. When it is driven with OnValueChanged event, what it will trigger can be written with Scripts.
  6. Toggle (On/Off Switch): The toggle switch element allows the user to switch an option on or off. This can be used in game settings, options menu, checkboxes, etc. By default it comes with a Background and a Label component where the switch name is entered.
  7. Scroll View: The scroll view element makes content scrollable within a given area. This can be used for long lists, text documents, loading bars, etc. The properties of the scroll areas on the right and below can be customised.
  8. Panel (Panel): The Panel element is used to group other UI elements or to create backgrounds. This can be used for menus, windows, grouping and organising. Layers can be created on the canvas. For example, let’s say we pressed the Stop Game button on the game screen. We can notify the user that the game has stopped with a panel where the screen is slightly transparent where the game is stopped.

We can see examples of these components in the screenshot below:

After adding these elements to our Canvas, we can proceed to editing. We can adjust the properties of the element we want to edit by clicking on it in Canvas or selecting it in the Hierarchy Panel. Among these properties, the most commonly used ones are position, size, rotation, colour and text content, if any.

We can create a hierarchy between these elements. In the Hierarchy section, using the drag-and-drop method, it is possible to sort them so that they are sub-elements of each other or one below the other. Or we can group them with one or more of them. Adding hierarchy in this way means that the elements are interconnected and work together.

We can also add animations to make our UI design more impressive. For example, we can play a specific animation when a button is clicked or when the mouse is moved over a text box. We can use the Animator component for this, or we can edit our UI elements with ready-made animation tools to add animations. Since the topic of animation is a very large and separate article, I am not introducing it here. I will be preparing an article about animation in the future.

Tips for a Good UI Design

1. Usability Orientated Design: When designing the user interface, it is very important to ensure that users can easily use our game. A simple, intuitive and consistent design enhances the user experience.

2. Minimalism and Cleanliness: We should avoid unnecessary complexity and excessive embellishments in the interface. A minimalist design allows users to focus and quickly find the functions they want.

3. Responsiveness and Compatible Design: Developing a design that is compatible with different screen sizes and resolutions is another important point. Responsive design allows users to have a smooth experience on different platforms from mobile devices to desktop computers. It would not be nice to say that the buttons on the right side of the screen are not visible when you open our game on a mobile phone, just play it on a tablet. :)

4. Colour Selection and Contrast: We should choose the colours carefully and use a high contrast design. In other words, when the colours in the design are compared to each other, there should be a significant difference between them. We should use colours to highlight important elements to make it easier for users to read the text, but for example, the text should not be light yellow on a UI screen where the background is white.

5. Text and Font: We need to carefully choose text sizes, fonts and layout. This is very important for the text to be readable and for users to easily understand the messages.

6. Visual Hierarchy and Layout: We can use visual hierarchy to emphasise important elements. For example, large headings, prominent buttons and other elements that need to be focused on can easily attract the attention of users.

7. Interaction and Feedback: We need to provide feedback in response to users’ actions. By providing appropriate feedback when they click buttons or fill out forms, we can ensure that users understand what they are doing. For example, if the action takes place when a button is clicked but there is no change on the screen, the user cannot be sure whether they clicked or not and a good user experience is not created.

8. Testing and Improvement: Finally, we should definitely test our design with real users and make improvements by taking feedback into account.

How to create a user interface, which elements can be added, what should be considered? I tried to explain these as much as I could. A user-oriented design is a very important issue as it will enable users to use our game more easily and enjoyably. I hope I have been useful.

Have a good work.

Selin.

Unity ve UI Tasarımı


Merhaba, bu yazımda Unity’de kullanıcı arayüzü nasıl hazırlanır, nelere dikkat edilmesi gerekir başlıklarında bilgi paylaşmak istiyorum.

Öncelikle kullanıcı arayüzü (UI) nedir, biraz bundan bahsedelim. UI bir oyun veya bir uygulamanın kullanıcıyla etkileşimde bulunduğu ana nokta ve birçok önemli rolü var. Bunlardan birisi kullanılabilirlik. UI, kullanıcıların bir oyunu veya uygulamayı kolayca anlamasını ve kullanmasını ve istedikleri işlevleri hızlı ve sorunsuz bir şekilde gerçekleştirmelerini sağlıyor. Bir başka önemli nokta ilk izlenim. İyi tasarlanmış bir UI, kullanıcıların oyunumuzu kullanmaya başladıklarında olumlu bir ilk izlenim elde etmelerini sağlar. Bu da oyunumuzu tekrar kullanma olasılığını büyük ölçüde etkileyebilir. Ve son rolü de oyunun anlaşılabilirliği. Bir oyunun kullanıcı arayüzü, oyuncuların oyun mekaniğini ve kurallarını anlamalarına yardımcı olur. Oyun içi menüler, göstergeler ve kontroller, oyuncuların oyun dünyasını keşfetmelerini ve etkileşimde bulunmalarını kolaylaştırır.

Bu sebeplerden ötürü UI ekranımızı çok iyi tasarlamamız, binbir emekle ortaya çıkardığımız oyunumuzu daha da parlatabilmek ve daha fazla kullanıcıya ulaşmasını sağlamak açısından çok gerekli.

Unity’de UI Ekranı Nasıl Oluşturulur?

Unity’de UI tasarımına başlamak için öncelikle bir Canvas oluşturmamız gerek. Canvas’ı, UI elemanlarınızın sahne üzerinde nasıl konumlandırılacağını belirleyen bir konteyner gibi düşünebiliriz.

Yukarıdaki gibi Unity Editor’de Hierarchy bölümünde sağ tıklayarak “UI” altında “Canvas” seçeneğini seçerek bir Canvas oluşturuyoruz. Canvas EventSystem ile birlikte ekleniyor. Bu canvas üzerine ekleyeceğimiz buton, slider gibi olay içeren bileşenleri yönetmeye yarıyor.,

Oyunumuzu 3D olarak geliştireceksek canvas üzerinde geliştirmeler yaparken yukarıdan 2D butonuna tıklamamız gerekiyor ki canvas tam karşımıza tam ekran şeklinde gelsin. Eğer 2D oyun geliştiriyorsak zaten 2D modunda görüntüleme yaptığımız için buna gerek yok.

Standart olarak gelen Canvas Inspector’unda en çok kullanılan property’lerden biri Scaler. Bununla UI elemanlarını farklı ekran boyutlarına ve çözünürlüklerine otomatik olarak uyumlu hale getirmek mümkün. Constant Pixel Size, UI elemanları sabit bir piksel büyüklüğünde kalmasını UI’nin farklı ekran boyutlarına göre ölçeklenmemesini sağlar. Scale With Screen Size’ı seçersek UI elemanları ekran boyutuna göre ölçekleniyor. Ekran boyutu büyüdükçe veya küçüldükçe UI elemanları da otomatik olarak ekran boyutuna uyum sağlıyor.

UI Elemanları

Canvasımızı oluşturduktan sonra artık ekranımızda şöyle bir görüntü oluyor ve biz bunu dilediğimiz gibi tasarlayıp doldurabiliyoruz:

Canvas’ı bir çerçeve gibi düşünürsek, bu çerçeve içerisine eklenebilecek temel UI elemanlarına geçelim.

  1. Text (Metin): Metin elemanı, ekranda metin göstermek için kullanılır. Bu, oyun içi mesajlar, puanlar, oyun menüsü metinleri vb. için idealdir. Renk, boyut, yazı tipi gibi özellikler özelleştirilebilir.
  2. Image (Resim): Resim elemanı, ekranda görsel içerik göstermek için kullanılır. Bu, arka planlar, düğme simgeleri, karakter portreleri vb. için kullanılabilir. Texture, sprite, renk gibi özellikler ayarlanabilir. Canvas’a resim ekleyebilmek için resim dosyasını proje dosyaları arasına atmak gerekir. Sonrasında ise Image öğesinin Inspector’unda Source Image bölümüne resim sürüklenebilir ya da dosya yolu yazılabilir.
  3. Button (Düğme): Düğme elemanı, kullanıcı etkileşimi için kullanılır. Kullanıcılar tıkladığında belirli bir işlemi gerçekleştirmek için kullanılabilir. Düğmeye basıldığında tetiklenecek olaylar atanabilir. Buton üzerine metin yazılması gerektiğinden Text bileşeni ile birlikte gelir. Default olarak On Click() eklentisi mevcuttur. Butona tıklandığında hangi olayın gerçekleşeceği Script ile yazılarak burada belirtilir.
  4. Input Field (Giriş Alanı): Giriş alanı elemanı, kullanıcının metin girmesine olanak tanır. Varsayılan olarak Text bileşeni ve ayrıca ne türden bir bilgi istendiğinin belirtilebileceği bir Placeholder ile birlikte gelir. Bu Text alanına yazılacak ifade, kullanıcı adı ve şifre alanları, arama kutuları, form girişleri vb. için olabilir.
  5. Slider (Sürgü): Sürgü elemanı, kullanıcıya bir değer aralığında bir kaydırıcı kullanarak bir değer seçme imkanı sunar. Örneğin, ses düzeyi ayarı için kullanılabilir. Varsayılan olarak birlikte gelen bileşenlerden Background slider çubuğunun arka planı ile ilgili özellikleri içerir. Fill Area kaydırıldığında değerin artırıldığı alan için değişiklik yapılabilecek özellikleri bulundurur. Handle Slide ise kaydırma için kullanılan top vb şekil ile ilgili özellikleri içerir. OnValueChanged event’i ile sürüldüğünde neyi tetikleyeceği Script’ler ile yazılabilir.
  6. Toggle (Açma/Kapama Anahtarı): Açma/kapama anahtarı elemanı, kullanıcının bir seçeneği açma veya kapatma olanağı sağlar. Bu, oyun ayarları, seçenekler menüsü, onay kutuları gibi yerlerde kullanılabilir. Varsayılan olarak bir Background ve anahtar isminin girileceği Label bileşeni ile birlikte gelir.
  7. Scroll View (Kaydırma Görünümü): Kaydırma görünümü elemanı, içeriği belirli bir alan içinde kaydırılabilir hale getirir. Bu, uzun listeler, metin dökümanları, yükleme çubukları vb. için kullanılabilir. Sağda ve aşağıda bulunan kaydırma alanlarının özellikleri kişiselleştirilebilir.
  8. Panel (Panel): Panel elemanı, diğer UI elemanlarını gruplamak veya arka plan oluşturmak için kullanılır. Bu, menüler, pencereler, gruplama ve düzenleme amacıyla kullanılabilir. Canvas üzerinde katman oluşturulabilir. Örneğin oyun ekranında Oyunu Durdur butonuna bastık diyelim. Oyun durduruldu ibaresinin yer alacağı ekranın bir miktar saydamlaştırıldığı bir panel ile oyunun durduğunu kullanıcıya iletebiliriz.

Bu bileşenlerin örneklerini aşağıdaki ekran görüntüsünde görebiliriz:

Canvas’ımıza bu elemanları ekledikten sonra düzenlemeye geçebiliriz. Düzenlemek istediğimiz elemanın üzerine Canvas’da tıklayarak veya Hiyerarşi Paneli’nde seçerek özelliklerini ayarlayabiliriz. Bu özellikler arasında en çok kullanılanları pozisyon, boyut, döndürme, renk ve varsa metin içerikleri gibi özelliklerdir.

Eklediğimiz bu elemanlar arasında hiyerarşi oluşturabiliriz. Hierarchy bölümünde sürükle-bırak yöntemini kullanarak birbirlerinin alt öğeleri veya alt alta gelecek şekilde bir sıralama yapmak mümkün. Veya içlerinden bir ya da birkaçı ile gruplandırma da yapabiliriz. Bu şekilde hiyerarşi eklemek elemanların birbirine bağlı olduğu ve birlikte çalıştığı anlamına gelir.

Ayrıca UI tasarımımızı daha etkileyici hale getirmek için animasyonlar ekleyebiliriz. Örneğin, bir düğmeye tıklandığında veya fare bir metin kutusunun üzerine getirildiğinde belirli bir animasyon oynatabiliriz. Bunun için Animator bileşenini kullanabilir veya UI elemanlarımızı animasyon eklemek için hazır animasyon araçlarıyla düzenleyebiliriz. Animasyon konusu çok geniş ve ayrı bir yazı konusu olduğu için burada ona giriş yapmıyorum. İlerleyen zamanlarda animasyon ile ilgili yazı da hazırlıyor olacağım.

İyi Bir UI Tasarımı İçin İpuçları

  1. Kullanılabilirlik Odaklı Tasarım: Kullanıcı arayüzü tasarlarken, kullanıcıların oyunumuzu kolayca kullanabilmesini sağlamak çok önemli. Basit, sezgisel ve tutarlı bir tasarım, kullanıcı deneyimini artırır.
  2. Minimalizm ve Temizlik: Arayüzde gereksiz karmaşıklıktan ve aşırı süslemelerden kaçınmalıyız. Minimalist bir tasarım, kullanıcıların odaklanmasını ve istedikleri işlevleri hızlıca bulmasını sağlar.
  3. Duyarlılık ve Uyumlu Tasarım: Farklı ekran boyutlarına ve çözünürlüklerine uyumlu bir tasarım geliştirmek de bir diğer önemli nokta. Duyarlı tasarım, mobil cihazlardan masaüstü bilgisayarlara kadar farklı platformlarda kullanıcıların sorunsuz bir deneyim yaşamasını sağlıyor. Geliştirdiğimiz oyunumuzu sadece tablette oynayın, cep telefonunda açtığınızda ekranın sağındaki butonlar görünmüyor demek hoş olmaz. :)
  4. Renk Seçimi ve Kontrast: Renkleri dikkatli bir şekilde seçmeliyiz ve yüksek kontrastlı bir tasarım kullanmalıyız. Yani tasarım içerisindeki renkler birbiriyle kıyaslandığında aralarında belirgin bir fark olmalı. Kullanıcıların metni okumasını kolaylaştırmak için önemli öğeleri vurgulamak için renkleri kullanmalıyız ama örneğin zeminin beyaz olduğu bir UI ekranında yazılar açık sarı olmamalı.
  5. Metin ve Yazı Tipi: Metin boyutları, yazı tipleri ve düzeni dikkatlice seçmemiz gerek. Metinlerin okunabilir olması ve kullanıcıların mesajları kolayca anlamaları için bu çok çok önemli.
  6. Görsel Hiyerarşi ve Düzen: Önemli öğeleri vurgulamak için görsel hiyerarşi kullanabiliriz. Örneğin büyük başlıklar, belirgin düğmeler ve odaklanılması gereken varsa diğer öğeler, kullanıcıların dikkatini kolayca çekebilir.
  7. Etkileşim ve Geri Bildirim: Kullanıcıların eylemlerine yanıt olarak geri bildirim vermeliyiz. Butonlara tıkladıklarında veya formları doldurduklarında uygun geri bildirimler sağlayarak kullanıcıların ne yaptığını anlamalarını sağlayabiliriz. Örneğin bir butona tıklandığında işlem gerçekleşiyor ancak ekranda bir değişiklik olmuyorsa kullanıcı tıklayıp tıklamadığından emin olamaz ve iyi bir kullanıcı deneyimi oluşmamış olur.
  8. Test Etme ve İyileştirme: Son olarak tasarımımızı mutlaka gerçek kullanıcılarla test etmeliyiz ve geri bildirimleri dikkate alarak iyileştirmeler yapmalıyız.

Kullanıcı arayüzü nasıl oluşturulur, hangi öğeler eklenebilir, nelere dikkat edilmelidir? Bunları elimden geldiğince anlatmaya çalıştım. Kullanıcı odaklı bir tasarım, kullanıcıların oyunumuzu daha kolay ve keyifli bir şekilde kullanmalarını sağlayacağından çok çok önemli bir konu. Umarım faydalı olabilmişimdir.

İyi çalışmalar.

Selin.