Flutter’da Layout Yönetimi Üzerine Cheat Sheet


Layout CheatSheet

Herkese merhaba,

Bugün sizler için flutter’da widget’larımızı UI ekranına nasıl yerleştireceğimiz konusunda kolay anlaşılır, görsel örneklerle zenginleştirilmiş ve hap bilgiler içeren bir içerik hazırlamak istedim. Umarım hepimiz için faydalı olur.

1. Ana Layout Widget’ları

Column

Amaç: Widget’ları dikey olarak sıralamak.

Kullanım Alanları: Bir liste oluştururken veya dikey bir düzenleme gerektiğinde kullanılır. Örneğin, bir form ya da bir profil sayfası tasarlarken kullanışlıdır.

Parametreler:

mainAxisAlignment: Dikey eksende hizalamayı ayarlar.

crossAxisAlignment: Yatay eksende hizalamayı ayarlar.

İpucu: Column, flex olarak kabul edilen bir yapıdır. İçerisine yerleştirilen widget'lar mevcut alanı doldurur ve Expanded ya da Flexible kullanılarak bu alanın nasıl paylaştırılacağı kontrol edilebilir.

Column(
mainAxisAlignment: MainAxisAlignment.center/end/spaceAround/spaceBetween/spaceEvenly/start,
children: [
Icon(Icons.home, size: 100, color: Colors.amber),
Icon(Icons.home, size: 100, color: Colors.teal),
Icon(Icons.home, size: 100, color: Colors.blueAccent),
],
),
Column — MainAxisAligment
Column(
crossAxisAlignment: CrossAxisAlignment.center/end/start/stretch,
children: [
Icon(Icons.home, size: 100, color: Colors.amber),
Icon(Icons.home, size: 200, color: Colors.teal),
Icon(Icons.home, size: 100, color: Colors.blueAccent),
],
),
Column — CrossAxisAlignment

Row

Amaç: Widget’ları yatay olarak yan yana sıralamak.

Kullanım Alanları: İkonlar ve metinlerin yan yana gösterilmesi gerektiği durumlarda kullanılır. Örneğin, bir uygulama çubuğunda (AppBar) ikonlar ve metinler genellikle Row ile düzenlenir.

Parametreler:

mainAxisAlignment: Yatay eksende hizalamayı ayarlar.

crossAxisAlignment: Dikey eksende hizalamayı ayarlar.

İpucu: Row, çocuk widget’larına yatay alan sağlar. Eğer öğeler fazla geniş olursa, taşma meydana gelebilir. Bu durumda Expanded ya da Flexible kullanmak gerekebilir.

Row(
mainAxisAlignment: MainAxisAlignment.center/end/spaceAround/spaceBetween/spaceEvenly/start,
children: [
Icon(Icons.home, size: 100, color: Colors.amber),
Icon(Icons.home, size: 100, color: Colors.teal),
Icon(Icons.home, size: 100, color: Colors.blueAccent),
],
),
Row — MainAxisAlignment
Row(
crossAxisAlignment: CrossAxisAlignment.center,
children: [
Icon(Icons.home, size: 100, color: Colors.amber),
Icon(Icons.home, size: 200, color: Colors.teal),
Icon(Icons.home, size: 100, color: Colors.blueAccent),
],
),
Row — CrossAxisAlignment

Stack

Amaç: Widget’ları üst üste yığmak.

Kullanım Alanları: Genellikle z-index kontrolü gerektiren durumlarda, yani bir widget’ın diğerinin üzerine bindirilmesi gerektiğinde kullanılır. Örneğin, bir görselin üzerine metin eklemek için kullanılabilir.

Parametreler:

Positioned: Çocuk widget'ı belirli bir konuma yerleştirmek için kullanılır. topleftrightbottom gibi parametrelerle pozisyon ayarlanabilir.

İpucu: Stack, hem esneklik hem de karmaşık düzenlemeler sunar. Align veya Positioned widget'larıyla öğeler belirli noktalara hizalanabilir veya konumlandırılabilir.

Stack(
children: [
Container(color: Colors.blue, width: 100, height: 100),
Positioned(
top: 10,
left: 10,
child: Icon(Icons.star, color: Colors.white),
),
],
);
Stack

2. Esnek Layout Widget’ları

Expanded

Amaç: Mevcut alanın tamamını doldurmak veya esnek bir alan kaplamak.

Kullanım Alanları: Genellikle Row veya Column içinde kullanılarak bir widget’ın kalan boşluğu doldurması sağlanır. Örneğin, ekranın genişliğini tamamen kaplamasını istediğiniz bir buton için kullanabilirsiniz.

Parametreler:

flex: Birden fazla Expanded widget olduğunda, her birine ayrılacak alan oranını belirler.

İpucu: Expanded, bir Row veya Column içindeki alanı, diğer öğelerle esnek bir şekilde paylaşır. flex parametresi ile bu paylaşım oranı ayarlanabilir.

Row/Column(
children: [
Expanded(flex: 2, child: Container(color: Colors.amberAccent)),
Expanded(flex: 1, child: Container(color: Colors.teal)),
],
),
Row ve Column içerisinde Expanded kullanımı

Flexible

Amaç: Bir widget’ın mevcut alanı doldurması, ancak bu alanın esnek olabilmesi için kullanılır.

Kullanım Alanları: Bir widget’ın belirli bir alan kaplaması gerektiğinde, ancak bu alanın daha da genişleyebilmesi veya daralabilmesi için kullanılır.

Parametreler:

fitFlexFit.tight (Expanded gibi tüm alanı kaplar) veya FlexFit.loose (yalnızca ihtiyaç duyduğu kadar alan kaplar).

İpucu: Flexible, Expanded’a göre daha kontrollü bir esneklik sunar. fit parametresiyle ne kadar alan kaplayacağı belirlenebilir.

Row/Column(
children: [
Flexible(child: Container(color: Colors.green, height: 100)),
Flexible(fit: FlexFit.loose, child: Container(color: Colors.yellow, height: 160)),
],
),
Row ve Column içerisinde Flexible kullanımı

3. Kutu (Box) Widget’ları

Container

Amaç: Bir widget’ı stilize etmek, padding, margin ve dekorasyon eklemek için kullanılır.

Kullanım Alanları: Genellikle bir widget’ın stilini ve boyutunu kontrol etmek için kullanılır. Bir resmin üzerine gölge eklemek veya bir metni belirli bir alanda konumlandırmak için ideal bir seçimdir.

Parametreler:

padding: İçeriğin kenarlarından olan boşluk.

margin: Dışarıdan olan boşluk.

decoration: Arka plan rengi, border veya gölge eklemek için kullanılır.

İpucu: Container, stil ve düzenleme kontrolü sağlar. İçerisine yerleştirilen widget’ın stilini ve pozisyonunu kontrol etmek için kullanılır.

Container(
padding: const EdgeInsets.all(16.0),
margin: const EdgeInsets.all(8.0),
decoration: BoxDecoration(
color: Colors.blue,
borderRadius: BorderRadius.circular(10),
),
child: const Text(
'Container with Padding',
style: TextStyle(fontSize: 26.0),
),
),
Padding parametresi verilmiş bir Container Örneği

SizedBox

Amaç: Sabit genişlik ve yükseklik belirlemek.

Kullanım Alanları: İki widget arasında sabit bir boşluk bırakmak veya belirli bir boyutta bir widget oluşturmak için kullanılır.

İpucu: SizedBox, boşluk oluşturmak veya belirli bir boyutta görünür/görünmez widget yerleştirmek için kullanılabilir.

SizedBox(
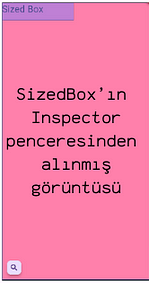
width: 100,
height: 50,
child: Text('Sized Box',
style: TextStyle(fontSize: 26.0),
),
),
SizedBox — Inspector

Padding

Amaç: Bir widget’ın etrafına boşluk eklemek.

Kullanım Alanları: İçeriğin kenarlardan belirli bir uzaklıkta olması gerektiğinde kullanılır. Örneğin, bir butona içeriden boşluk eklemek için kullanabilirsiniz.

İpucu: Padding, Container gibi bir stil widget’ı olup sadece padding eklemek için optimize edilmiştir.

Padding(
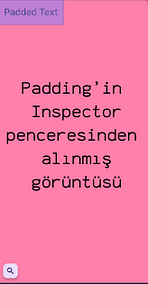
padding: EdgeInsets.all(16.0),
child: Text(
'Padded Text',
style: TextStyle(fontSize: 26.0),
),
),
Padding — Inspector

Align

Amaç: Bir widget’ı belirli bir konuma hizalamak.

Kullanım Alanları: Widget’ı bir alan içinde belirli bir noktaya yerleştirmek gerektiğinde kullanılır. Örneğin, bir butonu sağ alt köşeye hizalamak için Align kullanılabilir.

İpucu: Align, genişliği ve yüksekliği belirli olmayan widget’ları hizalamak için ideal bir widget’tır.

Align(
alignment: Alignment.bottomRight,
child: Text(
'Aligned to Bottom Right',
style: TextStyle(fontSize: 26.0),
),
),
Alignment

Center

Amaç: Bir widget’ı merkezlemek.

Kullanım Alanları: Bir widget’ın dikey ve yatayda tam ortalanması gerektiğinde kullanılır.

İpucu: Center, Align widget’ının özel bir halidir ve hizalamayı her zaman merkeze alır.

Center(
child: Text('Centered Text',
style: TextStyle(fontSize: 26.0),
),
);
Center ve Text widget’ları içiçe

4. Grid Düzenlemeleri

GridView

Amaç: Widget’ları ızgara (grid) şeklinde düzenlemek.

Kullanım Alanları: Bir galeri uygulaması veya ürün kataloğu gibi ızgara düzenlemesi gerektiren yerlerde kullanılır.

Parametreler:

crossAxisCount: Yatayda kaç sütun olacağını belirler.

mainAxisSpacing ve crossAxisSpacing: Izgaralar arasındaki boşlukları ayarlar.

İpucu: GridView, öğeleri otomatik olarak ızgaraya yerleştirir. GridView.count kullanımı, belirli bir sütun sayısı belirlemenizi sağlar.

GridView.count(
crossAxisCount: 3,
mainAxisSpacing: 10,
crossAxisSpacing: 10,
children: [
Container(color: Colors.redAccent),
Container(color: Colors.greenAccent),
Container(color: Colors.blueAccent),
],
),
GridView

GridView.builder

Amaç: Dinamik ve performans dostu ızgara düzenlemeleri oluşturmak.

Kullanım Alanları: Büyük veri setleriyle çalışırken performansı artırmak için kullanılır. Örneğin, sonsuz kaydırma özelliği olan bir ürün listesi.

İpucu: GridView.builder, ekranda olmayan widget'ları oluşturmaz, bu sayede performans artışı sağlar.

GridView.builder(
gridDelegate: const SliverGridDelegateWithFixedCrossAxisCount(
crossAxisCount: 3),
itemBuilder: (context, index) {
return Container(
color: Colors.lightBlueAccent,
child: Text(
'$index',
style: const TextStyle(fontSize: 26.0),
),
);
},
),
GridView.builder

5. List Düzenlemeleri

ListView

Amaç: Widget’ları dikey bir liste halinde düzenlemek.

Kullanım Alanları: Basit bir listeleme gerektiğinde kullanılır. Örneğin, bir sohbet uygulamasında mesajları listelemek için idealdir.

İpucu: ListView, çok sayıda öğeyi kaydırarak gösterebilir. Performans için ListView.builder tercih edilebilir.

ListView(
children: const [
ListTile(
title: Text(
'Item 1',
style: TextStyle(
fontSize: 26.0,
color: Colors.red,
),
),
),
ListTile(
title: Text(
'Item 2',
style: TextStyle(
fontSize: 26.0,
color: Colors.blue,
),
),
),
],
),
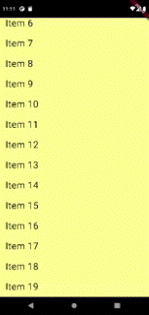
ListView içinde ListTile Kullanımı

ListView.builder

Amaç: Performanslı ve dinamik bir liste oluşturmak.

Kullanım Alanları: Büyük veri setleriyle çalışırken veya öğelerin dinamik olarak üretildiği durumlarda kullanılır. Örneğin, sonsuz kaydırma listesi.

İpucu: ListView.builder, yalnızca ekranda görünen öğeleri oluşturur, bu da performansı önemli ölçüde artırır.

ListView.builder(
itemCount: 20,
itemBuilder: (context, index) {
return ListTile(
title: Text(
'Item $index',
style: const TextStyle(fontSize: 26.0),
),
);
},
),

ListView.separated

Amaç: Liste öğeleri arasına ayrım çizgisi eklemek.

Kullanım Alanları: Ayrılmış öğeler gerektiren listeler için kullanılır. Örneğin, bir rehber uygulamasında kişi listesi.

İpucu: ListView.separated, her öğe arasında belirli bir widget ekler, genellikle Divider kullanılır.

ListView.separated(
itemCount: 10,
separatorBuilder: (context, index) => const Divider(
thickness: 2.0,
),
itemBuilder: (context, index) {
return ListTile(title: Text('Item $index'));
},
),
ListView.separated

6. Diğer Yararlı Widget’lar

Spacer

Amaç: İki widget arasına boşluk eklemek.

Kullanım Alanları: Row veya Column içinde iki widget arasında boşluk bırakmak için kullanılır.

İpucu: Spacer, Expanded gibi davranır, ancak Row veya Column içindeki alanı diğer öğelere göre dengeler.

Column(
children: [
Text(
'Start',
style: TextStyle(fontSize: 26.0, fontWeight: FontWeight.bold),
),
Spacer(),
Text(
'End',
style: TextStyle(fontSize: 26.0, fontWeight: FontWeight.bold),
),
],
),
Spacer Örneği

Wrap

Amaç: Yatay veya dikey olarak sıkıştırılmış widget’ları sarar, taşma durumunda alt satıra geçer.

Kullanım Alanları: Yatayda sığmayan öğelerin, alt satıra geçmesi gereken durumlarda kullanılır. Örneğin, etiket (chip) widget’ları.

İpucu: Wrap, esnek bir düzen sağlar ve widget’lar satıra sığmadığında otomatik olarak yeni bir satıra geçer.

Wrap(
spacing: 18.0,
runSpacing: 14.0,
children: [
Chip(label: Text('Chip 1')),
Chip(label: Text('Chip 2')),
Chip(label: Text('Chip 3')),
],
),
Wrap widget

AspectRatio

Amaç: Widget’a belirli bir en-boy oranı vermek.

Kullanım Alanları: Görsellerin veya videoların belirli bir en-boy oranıyla gösterilmesi gerektiğinde kullanılır. Örneğin, bir video oynatıcı penceresi.

İpucu: AspectRatio, verilen oran doğrultusunda genişlik ve yüksekliği hesaplar, bu sayede düzen tutarlılığı sağlanır.

Scaffold(
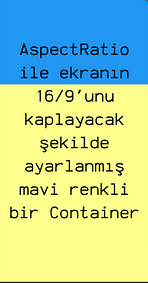
backgroundColor: Colors.yellowAccent.shade100,
body: AspectRatio(
aspectRatio: 16 / 9,
child: Container(color: Colors.blue),
),
),

Flutter’da Layout yönetimi için hazırlamış olduğum bu içeriği umarım beğenirsiniz.

İyi çalışmalar.

Selin.


Artificial Intelligence with Unity: Introducing Intelligent Behaviour to Game Characters

Artificial Intelligence with Unity

Hello everyone, today I wanted to research something on Unity and I came across artificial intelligence almost everywhere. Because artificial intelligence (AI) in the game development world is like a magical world! AI gives realistic behaviours to game characters, making the game world feel more dynamic and intelligent. Think about it, in a game you are playing, if enemies make strategic moves or NPCs exhibit environmentally sensitive behaviours, how much it strengthens the atmosphere of the game, right?

In this article, we will talk about how you can give intelligent behaviours to game characters using Unity. In other words, making your enemy characters feel like real opponents instead of just bricks!

1. Let’s Meet Artificial Intelligence

Firstly, what is artificial intelligence? Actually, what we call game AI is to ensure that the characters act according to certain rules and algorithms. The aim is to create an opponent or friend that is more dynamic and reacts according to the situation, rather than a character that only exhibits scripted behaviour.

The first step in developing artificial intelligence in Unity is to learn pathfinding and movement systems. Here we come across NavMesh.

2. NavMesh: Let’s Draw Paths for Our Characters!

One of the most common ways to determine how characters move through the environment in Unity is to use NavMesh (Navigation Mesh). NavMesh defines paths and areas where characters can move. Once you have created this, you have solved the question of how your character will reach a certain point. Let’s look at this in a little more detail:

What is NavMesh?

NavMesh is a virtual network that defines navigable areas in the game world. This network determines the paths and obstacles along which characters can move. For example, it includes floors, walls, and other obstacles where characters can walk. NavMesh is like a map that allows characters to move in a natural and logical way.

How to Create NavMesh?

To create a NavMesh, you must follow these steps:

  1. In the Unity Editor, open the Navigation window by clicking AI and then Navigation from the Window menu.
  2. To specify which areas of the floor and other surfaces in your game to create NavMesh on, mark these areas as ‘Navigation Static’. This ensures that these surfaces are taken into account when creating the NavMesh.
  3. In the Navigation window, go to the Bake tab and create the NavMesh by clicking the Bake button. Unity analyses the navigable areas in the scene and converts them into NavMesh.

NavMesh Agent Component

To make your characters move on the NavMesh, you need to add the NavMesh Agent component to each character. This component controls the character’s movement on the NavMesh.

Add the NavMesh Agent component to your character and set the component’s properties (speed, rotation speed, acceleration, etc.). These settings determine how your character moves on the NavMesh.

Movement and Goal Setting

To make your character reach a specific point, you can set destination points using the NavMesh Agent component:

  • Setting a Destination by Code: You can use the NavMesh Agent component to make the character move to a target point. For example, to make an enemy character follow the player, you can set the player’s position as the destination.
using UnityEngine;
using UnityEngine.AI;

public class EnemyAI : MonoBehaviour
{
public Transform player; // Player Object
private NavMeshAgent agent;
void Start()
{
agent = GetComponent<NavMeshAgent>();
}
void Update()
{
if (player != null)
{
agent.SetDestination(player.position); // Direct the enemy to the player's position
}
}
}
  • Reaching Destinations: When your character moves on NavMesh, the NavMesh Agent component automatically calculates the character’s path and ensures that he reaches the destination by the shortest route.

Barriers and Dynamic Changes

In some cases, there may be dynamic changes in the scene (for example, moving obstacles). In such cases, NavMesh needs to react to these changes. You can use the NavMesh Obstacle component to do this. This component specifies how obstacles in the scene affect NavMesh. It allows obstacles to have an effect on the NavMesh and allows characters to overcome or go around them when necessary.

3. Time for Decision Making: Behaviour Trees

You’ve got your characters moving, great! Now it’s time for them to make decisions. You can use behaviour trees or finite state machines (FSM) to determine how your game characters react to certain situations.

Behaviour trees are an effective way to model decision-making processes. For example, when an enemy character sees your player, will it decide to attack or run away? You can model such decisions as branching trees. You can also find great add-ons in the Unity Asset Store that facilitate this functionality.

The FSM provides a structure that represents a character’s states. Your character’s state can change from ‘patrolling’ to ‘attacking’ if they recognise danger. This structure allows for more organised and manageable character behaviour.

4. Friend or Enemy? Let’s Categorise Our Characters

There are different types of AI in each game: Enemies, friends and independent NPCs. You will need to develop different behaviours for each of them. For example, your enemy AI will attack the player, while your friendly AI character will perhaps try to help them. Developing different strategies for each AI type makes your job easier and your characters more interesting.

5. Smarter AI with Machine Learning: Unity ML-Agents

If you want to go even deeper into AI, you can train your characters using machine learning (ML) with Unity ML-Agents. Unity offers tools that facilitate AI training in your games with ML-Agents. With ML-Agents, your characters can have the ability to learn in-game. Rather than pre-coding your characters’ behaviour, this allows them to make decisions on their own in certain situations.

For example, your enemies can learn the player’s strategies over time and develop more complex attack strategies. This can make the game experience much more dynamic and challenging.

6. Inspirations from the Real World!

There are many games that develop AI using Unity. For example, Alien: Isolation, for example, managed to give the player a constant sense of danger by using artificial intelligence in an impressive way. The strategic movement of your enemies on the playing field and their challenge to the player will take your game to the next level.

In conclusion, developing AI with Unity seems to be the key to providing your players with a more realistic and richer experience, given recent developments. From simple NavMesh implementations to complex AI behaviour trees and even machine learning, there is a wide range of AI development methods available, and this is truly a vast subject. If you want the characters in your games to be ‘smarter’, you should start learning the tricks of AI development.

Happy coding to everyone.

Selin.