android etiketine sahip kayıtlar gösteriliyor. Tüm kayıtları göster

GitHub and Simple Commands


Hello,
This week I am starting the Git and Github series. In my first article, I will define basic commands and terminology. In the following articles, I will cover advanced git commands and GitHub Desktop operations.

Git & GitHub & GitHub Desktop
Git is a version control system.
GitHub is where we store our code and collaborate with others. It serves to store open source code. It allows two different codes of a project to be merged.
GitHub Desktop helps us work with GitHub locally.

Why should we use GitHub?

  • The most widely used version control system in the world.
  • It is free for individual users and cheap for teams and companies.
  • We can follow software developers on the platform, make comments and bug reports on open source developed codes.
  • Thanks to forking, we can contribute to the development of open source codes.

GitHub Terminology

  • Repository: We can liken it to a folder or repository. It contains all the files of the project and the revision history of each file.
  • Branch: The version of the project separated from the main work. If we think of the main project as a tree trunk, we can liken the branch, which is the side version, to the branch or branches of the tree. A project can have more than one branch.
  • Fork: A copy of a repository in a github account. It allows us to freely experiment with changes without affecting the original project. We can fork any public repository on our computer.
  • Clone: The process of copying a repository on GitHub to the local computer.
  • Main/Master: The main branch of a repository. In older GitHub versions it is called master, in newer versions it is called main.
  • Pull: The process of withdrawing all or a certain part of a repository to a computer (local).
  • Push: Sending the changes made in the project files to the github servers.
  • Merge: Merging a branch on a repository with another branch. Conflict may occur at the end of the process.
  • Conflict: Conflict when merging two branches. Such as different codes written on the same lines. Some of them GitHub resolves automatically, some need to be resolved manually.
  • Pull Request: GitHub’s way of notifying interested parties about your request to include your changes in the relevant branch.
  • Stash: Keeping the changes made while navigating between two branches without committing, storing them, and recalling them when necessary.
  • Discard: Deleting changes made while navigating between two branches.
  • Remote: Assets, files, etc. on GitHub servers.
  • Local: Entities within our local computer.

Simple Commands

git clone repository url written to copy a repository from remote to local

git remote add origin repository url : to synchronise a remote repository with the local repo.

git push -u origin main : after the change, we write it so that we can resend it to remote.

If there is a modified repo in remote (it may have been modified on another computer or GitHub page), we use fetch and pull commands to pull it to local.

git fetch : pulls the changes from remote but does not show it in local files, it just writes it into a hidden git file.

git pull : We execute this command so that it is also reflected in the local files.

git branch -a : lists all branches, both remote and local.

git branch : lists only the branches located locally.

git checkout -b branchname : creates a new branch and switches to this branch with a single command.

git checkout branchname : switches to the existing branch whose name is written in the command.

git add . / git add -A : allows to index all files.

git add filename : only indexes the named file.

git commit -m “message : It is used to upload the files added to the directory or those that have been modified to the local repository. Since the added message will appear on the screen where the commits are listed, it is important to write the information about what kind of change was made in this field so that it can be understood correctly when the project is examined later.

git push -u origin branchname : Adds the named branch opened in local to remote. Now main and the named branch appear separately in remote. After this stage, if desired, this branch and main can be merge.Açılan yeni branch’ta yapılan değişiklikleri main/master’a taşıma mergekomutu ile yapılır. Branch’ı main’e taşıyabilmek için:

  • git checkout main : switches to main.
  • git merge origin/branch name hosting the change : moves commits added to branch to main.
  • git push : The process is completed by sending the latest version to GitHub.
  • Merge can alternatively be done in the GitHub interface. Suppose we made a change in the branch and committed this change to GitHub. When the relevant branch is selected on the GitHub page, the following screen appears.
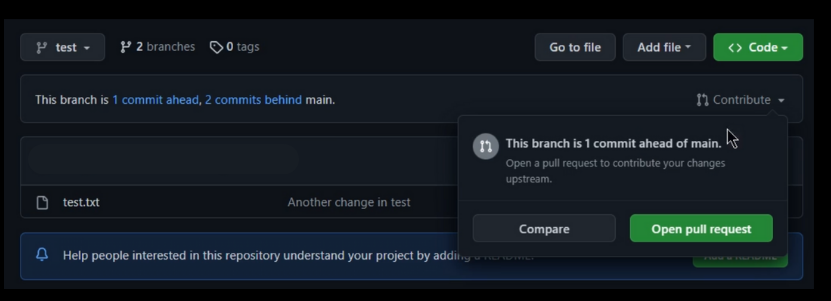
The warning at the top means that branch is 1 commit ahead of main. Here, when we click the “Open pull request” button, the first thing we will pay attention to on the screen that appears is the base and compare fields.
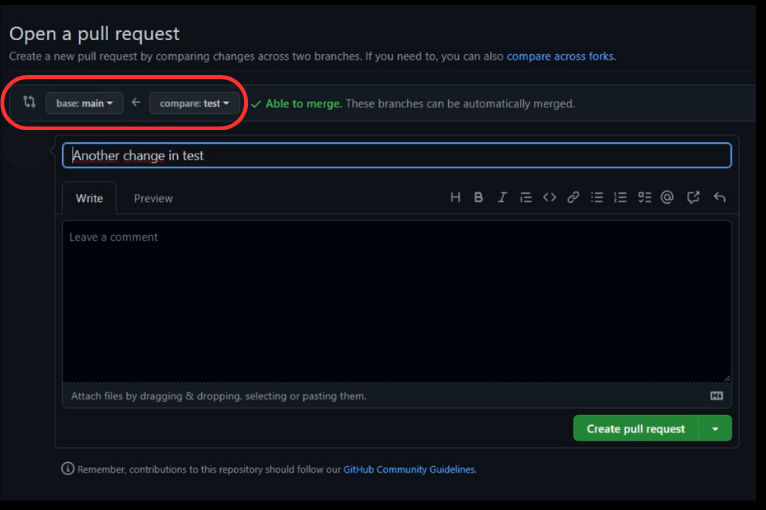
Since we want to add the changes made in the branch to main, it should be base: main and compare: branch.

When we click the “Create pull request” button by adding a description, if there is no conflict between branch and main, the “Merge pull request” button becomes active. Click “Confirm merge” by adding a new description. With this, both sections are synchronised. After this stage, the branch can be deleted if desired. We can do this with the “Delete branch” button on the same page.

NOT: Since this merge operation using the GitHub interface is done remotely, no changes are displayed in the local files. In order to do this, we need to pull the latest state of the project to our computer with the git pull command.

One of the reasons for conflict is that different codes are written on the same line number of the same file in different branches.

Changes are committed and pushed separately in both branches. Afterwards, when we switch to main and want to merge as I described above, we get an error telling us that conflict occurs, automatic correction cannot be done, conflicts should be committed after they are corrected. When we return to the IDE we are using (Visual Studio Code, Atom, etc.), options about which lines conflict occurred and what can be done about it appear.

Conflict View in Visual Studio Code
  • Accept Current Change
  • Accept Incoming Change
  • Apply Both Changes
  • Compare Changes

After selecting which one we want to apply (one of the first 3 options), we can perform the commit & push operation. The relevant change is made in Main. Nothing changes in the other branch. If we come to the branch and do the same merge operation here (reverse merge), the two branches will be merged successfully since there will be no conflict with the current version of the main file.

git stash : storing a change without committing it, keeping it in local memory. When is it used? Let’s say there are parts of code that don’t work in our file. At the same time, working changes will come from another branch. Before merging these changes with our file, we hide the non-working parts with stash. We get the changes coming from the other branch with mergeand then with git stash pop, we bring back our codes that we keep temporarily in local memory. With git stash apply, we both assign our codes to local memory and keep them visible.

git restore . : deletes all uncommitted or unstashed changes.

git reset --hard : Returns to the last commit, deletes all other changes, but the changes stored with stash continue to be kept in memory. In other words, when we run the git stash apply command, the stored changes come back. This command is valid for changes made before commit. Even if it is not pushed, the committed changes are kept in the record.

git revert commit id : A very long commit id is created in every commit operation we do. We can see this with the git log command or from the screen where commits are listed in the GitHub interface. When we run the revert command with this id, our project returns to the moment that commit was made. But while doing this, it does not delete the changes made in the meantime, instead it creates a new commit with a reverse change and returns it back to the relevant commit. And when we open the log screen again, we see that the message of the last commit starts with the REVERTkeyword.

That’s all the information from our Git series. I would be very pleased if you support me by reading my articles for more. I hope it will be useful.

Thank you for your reading.

Selin.

GitHub ve Basit Komutlar


Merhaba,

Bu hafta Git ve Github serisine başlıyorum. İlk yazımda basit komutları ve terminolojiyi tanımlayacağım. İlerleyen yazılarımda ileri seviye git komutları ve GitHub Desktop üzerinden yapılan işlemlere de değineceğim.

Git & GitHub & GitHub Desktop

Git, bir versiyon kontrol sistemidir.

GitHub, kodumuzu depoladığımız ve başkalarıyla işbirliği yaptığımız yerdir. Açık kaynak kod depolamaya yarar. Bir projeye ait iki farklı kodun birleştirilmesini sağlar.

GitHub Desktop, GitHub ile lokal olarak çalışmamıza yardımcı olur.

Neden GitHub kullanmalıyız?

  • Dünyada en çok kullanılan versiyon kontrol sistemi.
  • Bireysel kullanıcılar için ücretsiz, takımlar ve firmalar için ise ucuz.
  • Platformda yazılımcıları takip edebilir, açık kaynak geliştirilen kodlar üzerinde yorumlar, hata bildirimleri yapabiliriz.
  • Forking sayesinde yine açık kaynak kodların geliştirilmesine katkıda bulunabiliriz.

GitHub Terminolojisi

  • Repository: Klasör veya depoya benzetebiliriz. Projenin tüm dosyaları ve her dosyanın revizyon geçmişi yer alır.
  • Branch: Projenin ana çalışmadan ayrılan sürümü. Ana projeyi ağaç gövdesine benzetirsek yan sürümü olan branch’ı ağacın dalına veya dallarına benzetebiliriz. Bir projede birden fazla branch olabilir.
  • Fork: Bir repository’nin github hesabında olan kopyası. Orjinal projeyi etkilemeden değişiklikleri özgürce denememizi sağlar. Public olarak açılmış her repository’yi bilgisayarımıza fork edebiliriz.
  • Clone: GitHub’da bulunan bir repository’yi lokal bilgisayara kopyalama işlemi.
  • Main/Master: Bir repository’nin ana branch’ı. Eski GitHub versiyonlarında master, yeni versiyonlarda main olarak geçer.
  • Pull: Bir repository’nin hepsi veya belirli bir kısmının bir bilgisayara (lokale) çekilme işlemi.
  • Push: Proje dosyalarında yapılan değişikliklerin github server’larına gönderilmesi.
  • Merge: Bir repository üzerinde bulunan branch’in başka bir branch ile birleştirilmesi. İşlem sonunda conflict oluşabilir.
  • Conflict: İki branch birleştirilirken oluşan çakışma. Aynı satırlara yazılan farklı kodlar gibi. Bazılarını GitHub otomatik olarak çözer, bazılarının manuel olarak çözülmesi gerekir.
  • Pull Request: Çekme isteği. GitHub’ın yaptığınız değişiklikleri ilgili dala dahil etme isteğiniz hakkında ilgili tarafları bilgilendirme yöntemi.
  • Stash: İki branch arasında gezinirken yapılan değişikliklerin commit’lemeden tutulması, saklanması, gerektiğinde geri çağrılması.
  • Discard: İki branch arasında gezinirken yapılan değişikliklerin silinmesi.
  • Remote: GitHub server’ları üzerinde bulunan varlıklar, dosyalar vs.
  • Local: Lokal bilgisayarımız içindeki varlıklar.

Basit Komutlar

git clone repository linki bir repository’yi remote’dan lokale kopyalamak için yazarız.

git remote add origin repository linki : remote’da bulunan bir repository’yi lokaldeki repo ile eşitleme.

git push -u origin main : değişiklik sonrası bunu remote’a yeniden gönderebilmek için yazarız.

Remote’da değiştirilmiş bir repo var ise (başka bir bilgisayarda veya GitHub sayfasında değiştirilmiş olabilir) bunu lokale çekebilmek için fetch ve pullkomutlarını kullanırız.

git fetch : değişiklikleri remote’dan çeker ancak bunu lokaldeki dosyalarda göstermez, sadece gizli git dosyası içine yazar.

git pull : lokaldeki dosyalara da yansıması için bu komutu çalıştırırız.

git branch -a : hem remote’da hem de lokal’deki tüm branch’ları listeler.

git branch : sadece lokalde bulunan branch’ları listeler.

git checkout -b branchismi : tek komutla hem yeni bir branch oluşturup hem de bu branch’a geçişi sağlar.

git checkout branchismi : var olan ve komutta ismi yazılan branch’a geçişi sağlar.

git add . / git add -A : tüm dosyaları dizine eklemeyi sağlar.

git add dosyaismi : sadece adı geçen dosyayı dizine ekler.

git commit -m “mesaj : dizine eklenen dosyaları veya değişiklik yapılmış olanları loakl depoya yüklemek için kullanılır. Eklenen mesaj commitlerin listelendiği ekranda görüneceğinden bu alana ne türden bir değişiklik yapıldığı bilgisinin yazılması sonradan proje incelemesi yapıldığında doğru anlaşılmasını sağlar, bu bakımdan önemlidir.

git push -u origin branchismi : ismi geçen ve lokal’de açılan branch’ı remote’a eklemeyi sağlar. Artık remote’da main ve adı geçen branch ayrı ayrı görünür. Bu aşamadan sonra istenirse bu branch ve main merge’lenebilir yani birleştirilebilir.

Açılan yeni branch’ta yapılan değişiklikleri main/master’a taşıma mergekomutu ile yapılır. Branch’ı main’e taşıyabilmek için:

  • git checkout main : main’e geçiş yapılır.
  • git merge origin/değişikliği barındıran branch ismi : branch’a eklenmiş commit’leri main’e taşır.
  • git push : GitHub’a en güncel hali gönderilerek işlem tamamlanır.

Merge işlemi alternatif olarak GitHub arayüzünde de yapılabilir. Branch’ta bir değişiklik yaptığımızı ve bu değişikliği GitHub’a commit ettiğimizi varsayalım. GitHub sayfasında ilgili branch seçildiğinde aşağıdaki ekran karşımıza çıkar.

Üstteki uyarı branch’ın main’in 1 commit önünde olduğu anlamına gelir. Burada “Open pull request” butonuna tıkladığımızda çıkan ekranda dikkat edeceğimiz ilk şey base ve compare alanlarıdır.

Burada branch’ta yapılmış değişiklikleri main’e eklemek istediğimiz için base: main ve compare: branch olmalı.

Açıklama ekleyerek “Create pull request” butonuna tıkladığımızda, branch ve main arasında bir conflict yoksa “Merge pull request” butonu aktif olur. Yeni açıklama eklenerek “Confirm merge” tıklanır. Bununla birlikte her iki bölüm birbirine eşitlenmiş olur. Bu aşamadan sonra istenirse branch silinebilir. Bunu da aynı sayfadaki “Delete branch” butonu ile yapabiliriz.

!!! GitHub arayüzü kullanılarak yapılan bu merge işlemi remote’da yapıldığından lokal’deki dosyalarda değişiklik görüntülenmez. Bunu da yapabilmek için projenin en güncel hali olan son durumunu git pull komutu ile bilgisayarımıza çekmemiz gerekir.

Conflict oluşmasının sebeplerinden biri, aynı dosyanın aynı satır numarasına farklı branch’larda farklı kodların yazılmış olmasıdır.

Değişiklikler her iki branch’ta da ayrı ayrı commit ve push edilir. Sonrasında main’e geçerek yukarıda anlattığım gibi merge etmek istediğimizde conflict oluştuğunu, otomatik düzeltme yapılamadığını, conflict’ler düzeltildikten sonra commit edilmesi gerektiğini anlatan bir hata alırız. Kullandığımız IDE’ye döndüğümüzde (Visual Studio Code, Atom vs), hangi satırlarda conflict oluştuğu ve bununla ilgili yapılabilecekler ile ilgili seçenekler görünür.

Visual Studio Code’da Conflict Görünümü
  • Mevcut Değişikliği Seç (Current)
  • Branch’tan Gelen Değişikliği Seç (Incoming)
  • İki Değişikliği de Uygula
  • Farklılıkları Kıyasla

Hangisini uygulamak istediğimizi seçtikten sonra (ilk 3 seçenekten biri) commit & push işlemini gerçekleştirebiliriz. Main’de ilgili değişiklik yapılmış olur. Diğer branch’ta herhangi bir şey değişmez. Branch’a gelip aynı merge işlemini burada da yaparsak (ters merge), main dosyasının güncel hali ile conflict oluşmayacağı için iki branch başarılı şekilde birleşmiş olur.

git stash : yapılan bir değişikliğin commit’lemeden saklanması, lokal hafızada tutulması. Ne zaman kullanılır? Dosyamızda çalışmayan kod kısımları var diyelim. Aynı zamanda başka bir branch’tan çalışan değişiklikler gelecek. Bu değişiklikleri dosyamızla birleştirmeden önce çalışmayan kısımları stash ile gizleriz. Diğer branch’tan gelecek değişiklikleri merge ile alırız ve sonrasında git stash pop ile lokal hafızada geçici tuttuğumuz kodlarımızı geri getiririz. git stash apply ile de hem kodlarımızı lokal hafızaya atarız hem de görünmeye devam etmesini sağlarız.

git restore . : commitlenmemiş veya stash edilmemiş tüm değişiklikleri siler.

git reset --hard : Son commit’e geri döner, diğer tüm değişiklikleri siler ancak stash ile depolanmış değişiklikler hafızada tutulmaya devam eder. Yani git stash apply komutunu çalıştırdığımızda tutulan değişiklikler geri gelir. Bu komut commit’lenmeden önce yapılan değişiklikler için geçerlidir. Push edilmese bile commit edilen değişiklikler kayıt altında tutulur.

git revert commit id : yaptığımız her commit işleminde oldukça uzun bir commit id oluşturulur. Bunu git log komutuyla veya GitHub arayüzündeki commitlerin listelendiği ekrandan görebiliriz. Bu id ile revert komutunu çalıştırdığımızda projemiz o commitin yapıldığı ana geri döner. Ama bunu yaparken arada yapılmış değişiklikleri silmez bunun yerine yeni bir commitile ters değişiklik oluşturarak ilgili commit’e geri döndürür. Ve yeniden log ekranını açtığımızda en son commit’in mesajının REVERT anahtar kelimesi ile başladığını görürüz.

Git serimizden bilgiler bu kadar. Daha fazlası için yazılarımı okuyarak destek verirseniz çok memnun olurum. Umarım faydalı olur.

Teşekkürler.

Selin.