unity UI etiketine sahip kayıtlar gösteriliyor. Tüm kayıtları göster

Asset Management and Modularity in Unity


Hello there! I took a break from writing about Unity and game development for a while, but now that I’m back, I can share what I’ve learned with you. For me, developing games with Unity is a creative and exciting process, but it is also very important to manage projects in an organized and efficient way. In this article, we will discuss asset management and modularity in Unity in detail. Let’s get started!

1. What is Asset and Why is it Important?

An Asset is any kind of item you add to your game in Unity. This includes various components such as graphics, sounds, animations, materials and scripts. Assets are the basic building blocks that make up your game.

Why is it important?

-Game Quality: Well-managed assets directly affect the quality and performance of your game.

-Development Process: An organized asset management accelerates the development process and increases efficiency.

-Teamwork: If you are working with a team, proper asset management makes it easier for team members to access the same resources.

2. Tips for Asset Management

Organize Folder Structure

In Unity projects, you need a good folder structure to keep your assets organized. You can create a structure like the one below:

  • Assets/: The main asset folder of your project.
  • Models/: 3D models and prefabs.
  • Textures/: 2D textures and sprites.
  • Materials/: Materials and shaders.
  • Sounds/: Sound effects and music files.
  • Animations/: Animation clips and animation controllers.
  • Scripts/: C# scripts and code files.
  • Prefabs/: Prefabs and reusable assets.

This structure makes it easier to find your assets and keeps your project organized.

Care About Naming Conventions

It is important to use a consistent and understandable naming structure when naming your Assets. Good naming should have the following characteristics:

  • Descriptive: Use descriptive names that indicate what the Asset is. For example, Player_Character_Model or Enemy_Alien_Texture.
  • Consistent: Apply the same naming standards across the entire project. This makes it easier to find and understand your assets.
  • Keep it simple: Names should be short and concise, but also clearly describe the content of the asset.

Clean Unnecessary Assets

Having unused or old assets in the project can lead to project clutter and increased load times. Periodically review the project and take the following steps:

  • Asset Removal: Remove unused assets from your project files.
  • Cleaning Tools: You can use tools from the Unity Asset Store or third-party tools to help you clean up.

3. What is Modularity and Why is it Important?

Modularity means breaking down the various components of your game into independent and reusable parts. This allows you to develop each component separately and use them in different places.

Why is it important?

  • Reusability: You can use the same component in multiple places.
  • Easy Maintenance: Changes to one component allow you to easily check their impact on the whole project.
  • Fast Development: Modular structures speed up adding new features and updating existing ones.

4. How to achieve modularity?

Use of Prefab

Prefabs allow you to create templates of an asset (or group of assets). For example, you can create a character prefab and use that prefab multiple times on stage.

  • Creating a prefab: Place an object on the stage and then drag it to the Assets folder to create a prefab.
  • Edit a prefab: When you edit a prefab, it automatically updates all instances in scenes.

ScriptableObjects

ScriptableObjects simplify data management and allow you to reuse that data in different places. For example, you can store a character’s health, speed and other properties with a ScriptableObject.

  • Creating a ScriptableObject: Create a new C# script in Assets and derive it from the ScriptableObjects class.
  • Data Storage: You can use ScriptableObjects to store in-game data (for example, character properties) and use this data in different places.

Modular Scene Design

Modularity in scene design means breaking scenes into small pieces. This allows you to design and organize each part of your scene individually.

  • Modular Parts: Break large scenes into small parts. For example, in a city scene, design buildings, roads and other elements separately.
  • Using Prefabs: Create modular parts as prefabs so you can use them in different scenes.

I hope you found this article useful! If you appreciate the information provided, you have the option to support me by Buying Me A Coffee! Your gesture would be greatly appreciated!


Asset management and modularity in Unity make your projects more organized, efficient and scalable. Good asset management improves the performance of projects and speeds up the development process. Modularity makes it easier to develop game components independently and make changes to projects.

The tips shared in this article can help you manage your Unity projects more efficiently.

Good work and good luck!

Selin.

Unity’de Asset Yönetimi ve Modülerlik


Merhaba! Unity ile ilgili yazılarıma ve oyun geliştirmeye bir süre ara vermiştim, şimdi yeniden başladığıma göre öğrendiklerimi sizinle paylaşabilirim. Benim için Unity ile oyun geliştirmek, yaratıcı ve heyecan verici bir süreç, ancak projelerin düzenli ve verimli yönetilmesi de çok önemli. Bu yazıda, Unity’de asset yönetimi ve modülerlik konularını detaylı bir şekilde ele alacağız. Hadi başlayalım!

1. Asset Nedir ve Neden Önemlidir?

Asset, Unity’de oyununuza eklediğiniz her türlü öğedir. Bu, grafikler, sesler, animasyonlar, materyaller ve scriptler gibi çeşitli bileşenleri içerir. Asset’ler, oyununuzu oluşturan temel yapı taşlarıdır.

Neden önemlidir?

-Oyun Kalitesi: İyi yönetilen asset’ler, oyununuzun kalitesini ve performansını doğrudan etkiler.

-Geliştirme Süreci: Düzenli bir asset yönetimi, geliştirme sürecini hızlandırır ve verimliliği artırır.

-Takım Çalışması: Eğer bir ekiple çalışıyorsanız, düzgün bir asset yönetimi, ekip üyelerinin aynı kaynaklara erişimini kolaylaştırır.

2. Asset Yönetimi İçin İpuçları

Klasör Yapısını Düzenleyin

Unity projelerinde, asset’lerinizi düzenli bir şekilde saklamak için iyi bir klasör yapısına ihtiyacınız vardır. Aşağıdaki gibi bir yapı oluşturabilirsiniz:

  • Assets/: Projenizin ana asset klasörü.
  • Models/: 3D modeller ve prefab’lar.
  • Textures/: 2D dokular ve sprite’lar.
  • Materials/: Malzemeler ve shaderlar.
  • Sounds/: Ses efektleri ve müzik dosyaları.
  • Animations/: Animasyon klipleri ve animasyon kontrolcüler.
  • Scripts/: C# scriptleri ve kod dosyaları.
  • Prefabs/: Prefab’lar ve yeniden kullanılabilir varlıklar.

Bu yapı, asset’lerinizi bulmayı kolaylaştırır ve projenizin düzenini korur.

İsimlendirme Kurallarına Uyun

Asset’lerinizi adlandırırken tutarlı ve anlaşılır bir isimlendirme yapısı kullanmak önemlidir. İyi bir isimlendirme şu özelliklere sahip olmalıdır:

  • Açıklayıcı olsun: Asset’in ne olduğunu belirten açıklayıcı isimler kullanın. Örneğin, Player_Character_Model veya Enemy_Alien_Texture.
  • Tutarlı olsun: Tüm projede aynı isimlendirme standartlarını uygulayın. Bu, asset’lerinizi bulmayı ve anlamayı kolaylaştırır.
  • Sade olsun: İsimler kısa ve öz olmalı, fakat aynı zamanda asset’in içeriğini net bir şekilde tanımlamalıdır.

Gereksiz Asset’leri Temizleyin

Kullanılmayan veya eski asset’lerin projede bulunması, projenin karmaşasına ve yükleme sürelerinin artmasına neden olabilir. Düzenli aralıklarla projeyi gözden geçirin ve aşağıdaki adımları uygulayın:

  • Asset Kaldırma: Kullanılmayan asset’leri proje dosyalarınızdan kaldırın.
  • Temizlik Araçları: Unity Asset Store’dan veya üçüncü taraf araçlardan temizlik yapmanıza yardımcı olacak araçlar kullanabilirsiniz.

3. Modülerlik Nedir ve Neden Önemlidir?

Modülerlik, oyununuzun çeşitli bileşenlerini bağımsız ve yeniden kullanılabilir parçalara ayırmak anlamına gelir. Bu, her bir bileşeni ayrı ayrı geliştirebilmenizi ve bu bileşenleri farklı yerlerde kullanabilmenizi sağlar.

Neden önemlidir?

  • Yeniden Kullanılabilirlik: Aynı bileşeni birden fazla yerde kullanabilirsiniz.
  • Kolay Bakım: Bir bileşende yapılan değişiklikler, tüm proje üzerindeki etkilerini kolayca kontrol edebilmenizi sağlar.
  • Hızlı Geliştirme: Modüler yapılar, yeni özellikler eklemeyi ve mevcut özellikleri güncellemeyi hızlandırır.

4. Modülerlik Nasıl Sağlanır?

Prefab Kullanımı

Prefab’lar, bir varlığın (veya varlık grubunun) şablonlarını oluşturmanıza olanak tanır. Örneğin, bir karakter prefab’ı oluşturup, sahnede bu prefab’ı birden fazla kez kullanabilirsiniz.

  • Prefab Oluşturma: Bir nesneyi sahneye yerleştirin ve ardından bu nesneyi Assets klasörüne sürükleyerek bir prefab oluşturun.
  • Prefab Düzenleme: Prefab’ı düzenlediğinizde, sahnelerdeki tüm örnekleri otomatik olarak günceller.

ScriptableObjects

ScriptableObject’lar, veri yönetimini kolaylaştırır ve bu veriyi farklı yerlerde yeniden kullanmanıza olanak tanır. Örneğin, bir karakterin sağlık, hız ve diğer özelliklerini ScriptableObject ile saklayabilirsiniz.

  • ScriptableObject OluşturmaAssets içinde yeni bir C# script oluşturun ve bu script’i ScriptableObjectsınıfından türetin.
  • Veri Saklama: ScriptableObject’ları kullanarak oyun içi verileri (örneğin, karakter özellikleri) saklayabilir ve bu verileri farklı yerlerde kullanabilirsiniz.

Modular Scene Design

Sahne tasarımında modülerlik, sahneleri küçük parçalara ayırmak anlamına gelir. Bu, sahnenizin her parçasını ayrı ayrı tasarlayıp düzenlemenizi sağlar.

  • Modüler Parçalar: Büyük sahneleri küçük parçalara ayırın. Örneğin, bir şehir sahnesinde binaları, yolları ve diğer öğeleri ayrı ayrı tasarlayın.
  • Prefab’lar Kullanımı: Modüler parçaları prefab olarak oluşturun, böylece bu parçaları farklı sahnelerde kullanabilirsiniz.

Unity’de asset yönetimi ve modülerlik, projelerinizi daha düzenli, verimli ve ölçeklenebilir hale getirir. İyi bir asset yönetimi, projelerdeki performansı artırır ve geliştirme sürecini hızlandırır. Modüler yapı ise, oyun bileşenlerini bağımsız olarak geliştirmenizi ve projelerde değişiklik yapmayı kolaylaştırır.

Bu yazıda paylaşılan ipuçları, Unity projelerinizi daha verimli yönetmenize yardımcı olabilir.

İyi çalışmalar ve bol şans!

Selin.

Using Joystick Step by Step with Unity

Unity and Joystick Control

 Hello,

In this article, I will tell you how to control the game with Joystick with Unity. Users prefer to play their games on mobile devices as well as computers and consoles and similar platforms, and writing games that will work on mobile is very popular today. We can use the advantage of the touch screen by adding a joystick to our game screen and make our game preferable.

So how to add Joystick to unity game project? How to control the joystick? How to move a character or object using a joystick? I will explain all of them step by step in my article.

I will start by assuming that you have already created a Unity project and added a character or an object that you want to move with a plane and a joystick to the game scene.

Adding Joystick

Step 1 : Add Collider and Rigidbody to the character we created.

Step 2 : Let’s add the Joystick package offered for free to our project from the link below.

Step 3: After downloading and importing our package using Package Manager, let’s add a Canvas to our project. It doesn’t matter if our project is 2D or 3D, it works in both cases. Because we need a Canvas object to place the joystick on the screen.

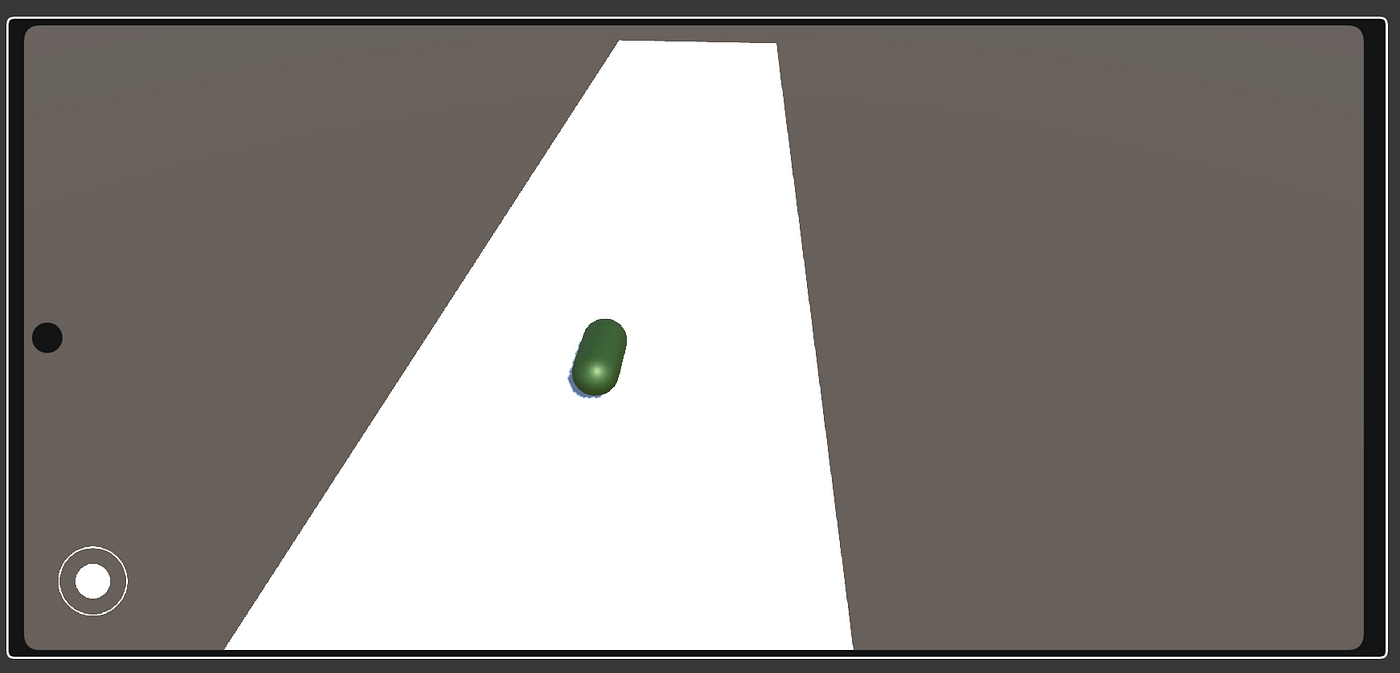
Step 4: Then drag and drop the Fixed Joystick from the prefabs folder in the package folders under the Canvas we created in the previous step. Since we have selected the prefab whose position is Fixed by default, the joystick will be placed in the lower left corner of the screen.

Step 5: Since we prefer to use our game on the mobile platform and with the screen tilted, let’s open the Build Settings screen, after adding the scene to the build screen, select IOS or Android and click Switch Platform.

On the Main Screen, where the Scene and Game windows are, Smilator should now be displayed instead of Game.

Step 6: In this step, let’s move on to screen sizing. Let’s change the Scaler property in the Inspector section of the Canvas we added to Scale With Screen Size. Here we can enter the screen sizes we are targeting.

Joystick Control

Step 7: After adjusting the screen sizes, it’s time for the coding part that will allow us to move our character or object. We can add the following codes to the Script file we will create in our Script folder.

 [SerializeField] private FixedJoystick _joystick;
[SerializeField] private float _moveSpeed;

private void FixedUpdate()
{
JoystickMovement();
}

void JoystickMovement()
{
float horizontal = _joystick.Horizontal;
float vertical = _joystick.Vertical;
Vector3 addedPosition = new Vector3(horizontal * _moveSpeed * Time.deltaTime, 0, vertical * _moveSpeed * Time.deltaTime);
transform.position += addedPosition;
}
Object Control with Joystick

I added a flat floor and a capsule as above for an example. We can think of it as a character. I especially tilted the capsule sideways by playing with its rotation because it already has a rigid body, so it automatically falls to the side as soon as we start the game.

Step 8: Let’s add the Script we wrote above to our character. Let’s not forget to assign our joystick that we added from the package folders to the _joystick variable, which we define as private here but make it accessible with the SerialiseField expression.

I tried to explain step by step how to add a joystick to a game in Unity and how to control it, I hope it was useful.

Thanks for your reading.

Selin.