mobile games etiketine sahip kayıtlar gösteriliyor. Tüm kayıtları göster

Performance Optimisation in Unity: Tips for Smoother and More Efficient Games


Unity and Performance Optimization

Hello everyone,

In this article, I will talk about performance, which is sometimes overlooked by most developers, including me, in the early stages of the game development process, but is very important. I said very important because performance is a critical factor that directly affects the player experience. In order to offer a smoother and more enjoyable experience to the players and to make our game more demanded and played, we need to develop by paying attention to details such as high frame rates (FPS) and low latency. Unity is a very powerful game engine in this sense, and when used correctly, it helps us develop high-performance games. Since I have experienced that it is so important, I have researched what we can do for performance optimisation with Unity, what are the most effective techniques and tips. Let’s get started.

1. Using Profiler

Unity Profiler is a tool for analysing game performance. Profiler monitors CPU and GPU usage, memory allocation, and other performance metrics. Thanks to this tool, we have the chance to identify the source of performance problems and find solutions for them.

How to use it?

  • First of all, we use Window => Analysis => Profiler to open the Profiler window. With this, we aim to see performance data.
  • Then we run Profiler while playing our game and wait for it to collect data in real time. By analysing the performance in different scenes, we get a feedback from the game.
  • At this point, we analyse the data we collect. For this, we can examine different tabs such as CPU, GPU, Rendering, Memory in the Profiler window and identify performance degrading points here.

2. Optimising Graphics Settings

LOD (Level of Detail) Usage

LOD allows distant objects to be rendered with less detailed models. This improves performance, especially in large scenes, by de-detailing some of the objects in the game.

  • Creating LOD Groups: In a game, we can create different levels of detail to let Unity know which objects should be rendered in more detail and which ones don’t need all the detail. We do this mostly for objects and manage it with the LOD Group component. Thus, especially in large scenes, objects that are not in sight are rendered with less detailed models and performance is increased.
  • Culling: We can improve performance by setting a game plan so that we do not need to render objects outside the camera field of view. We can increase performance by using Occlusion Culling.

Batching Techniques

  • Static Batching: Used for static (motionless) objects. It renders many objects with a single draw call.
  • Dynamic Batching: Used for dynamic (moving) objects. Reduces the number of draw calls by combining small and similar objects.

3. Physics and Collision Optimisation

Rigidbody and Collider Settings

  • Adding Rigidbody component unnecessarily may cause performance degradation. Instead, it is sufficient to add it only to objects that interact physically.
  • Another point about game performance is to use simpler Collider types if possible. Examples of simple Collider types are Box and Sphere. Using Mesh Colliders instead of more standardised ones like these can negatively affect performance.

Physics Simulation

  • Physics simulation is important to make the game realistic. However, physics calculations are often resource intensive, which affects game performance. The first thing we can do to prevent this is to set the Fixed Timestep value. The physics simulation is updated at certain time intervals, not every frame. This interval is called Fixed Timestep and we can set it in Edit => Project Settings => Time. This value is set to 0.02 (50 FPS) by default. We can adjust this value according to our game and performance requirements. A higher value means fewer physics updates, which can improve performance, but may reduce the accuracy of the physics simulation.
  • Another topic is what can be done with Physics Layers. Physics layers control which objects collide with each other. We can use these layers to prevent unnecessary collision checks. First we create new layers in Edit => Project Settings => Tags and Layers. Then we assign objects to the appropriate layers from the Inspector panel. Finally, in Edit => Project Settings => Physics, we determine which layers will collide with each other. For example, there may be collisions between player and bullet layers, but not between background objects and bullets. In this case, the unnecessary collision does not need to run in the background. And certainly not to degrade performance.

4. Memory Management

Object Pooling

  • This method allows us to create a certain number of objects in advance for frequently created and destroyed objects and reuse them. Especially since continuous creation and destruction of new objects can negatively affect performance, we can reduce this cost and prevent performance degradation with object pooling. Let’s also mention a few points to be considered while doing this. It is important to determine the initial size of the pool according to the needs of our game. A pool that is too small may cause continuous creation of new objects; a pool that is too large means unnecessary memory usage. Then what we do will not have the desired effect on performance. We should also keep a good track of the state of the objects. Objects must be made suitable for reuse. For example, bullets should return to the pool when they reach the target or after a certain period of time. Finally, when returning objects to the pool, we must remember to deactivate them. This prevents the objects from performing unnecessary calculations.
  • We also need to avoid creating new objects by caching objects that are used repeatedly.

Memory Usage Monitoring

  • With Unity Profiler we can monitor memory usage and identify unnecessary memory allocations.
  • We also need to minimise GC (Garbage Collection) operations. If we can prevent unnecessary memory allocation and reduce the activation of GC, this also contributes positively to performance.

5. Code Optimisation

Efficient Code Writing

  • LINQ (Language Integrated Query) makes it easier to make queries on data, but the performance cost is high. For this reason, it may be more advantageous to use classic loops and conditions instead of LINQ in parts where we expect high performance.
  • In C#, memory management is performed by Garbage Collector (GC). Memory is allocated when new objects are created and cleared by GC when these objects are not in use. However, unnecessary memory allocations and consequent attempts to delete unnecessary created objects can negatively affect performance.

Asynchronous Operations

  • Async and Await: Performing long-running operations such as network operations or disc read/write asynchronously ensures that the main game loop runs uninterrupted.

As a result, performance optimisation in Unity is of great importance as it makes our games run smoother and more efficiently. In this article, I have tried to explain techniques and tips that will help us improve our performance. I hope that by applying these tips, we can offer a better gaming experience to our players.

Good coding to all of us.

Thanks for reading.

Selin.

Unity’de Performans Optimizasyonu: Daha Akıcı ve Verimli Oyunlar İçin İpuçları


Unity ve Performans Optimizasyonu

Herkese merhaba,

Bu yazımda sizlere oyun geliştirme sürecinin ilk aşamalarında ben de dahil olmak üzere çoğu geliştiriciler tarafından zaman zaman göz ardı edilen ancak çok önemli olan performans konusundan bahsedeceğim. Çok önemli dedim çünkü performans oyuncu deneyimini doğrudan etkileyen kritik bir faktör. Oyunculara daha akıcı ve zevkli bir deneyim sunmak ve oyunumuzun daha fazla talep görmesi ve oynanması için yüksek kare hızları (FPS) ve düşük gecikme süreleri gibi detaylara dikkat ederek geliştirme yapmamız gerekiyor. Unity, bu anlamda çok güçlü bir oyun motoru ve doğru kullanıldığında yüksek performanslı oyunlar geliştirmemize oldukça yardımcı oluyor. Bu kadar önemli olduğunu deneyimlediğim için Unity ile performans optimizasyonu için neler yapabiliriz, en etkili teknikler ve ipuçları nelerdir, onları araştırdım. Gelin, başlayalım.

1. Profiler Kullanımı

Unity Profiler, oyunun performansını analiz etmek için kullanılan bir araç. Profiler, CPU ve GPU kullanımını, bellek tahsisini, ve diğer performans metriklerini izliyor. Bu araç sayesinde performans sorunlarının kaynağını tespit edip buna yönelik çözüm üretme şansına sahip oluyoruz.

Nasıl Kullanılır?

  • Öncelikle Profiler’ penceresini açmak için Window => Analysis => Profiler adımlarını kullanıyoruz. Bununla performans verilerini görmeyi amaçlıyoruz.
  • Sonrasında oyunumuzu oynarken Profiler’ı çalıştırıyoruz ve gerçek zamanlı olarak verileri toplamasını bekliyoruz. Farklı sahnelerdeki performansı inceleyerek oyundan bir feedback almış oluyoruz.
  • Bu noktada topladığımız verilerle ilgili analiz yapıyoruz. Bunun için Profiler penceresinde bulunan CPU, GPU, Rendering, Memory gibi farklı sekmeleri inceleyebiliriz ve buradaki performans düşüren noktaları belirleyebiliriz.

2. Grafik Ayarlarını Optimize Etmek

LOD (Level of Detail) Kullanımı

LOD, uzaktaki nesnelerin daha az detaylı modellerle render edilmesini sağlar. Bu, oyundaki nesnelerin bazılarını ayrıntılarından arındırarak özellikle büyük sahnelerde performansı artırır.

  • LOD Grupları Oluşturma: Bir oyunda hangi nesnelerin daha detaylı gösterileceği, hangilerinin tüm detaylarına ihtiyaç duyulmayacağını Unity’e bildirebilmek için farklı detay seviyeleri oluşturabiliriz. Bunu çoğunlukla nesneler için yaparız ve LOD Grubu bileşeni ile yönetiriz Böylelikle özellikle büyük sahnelerde göz önünde olmayan nesneler daha az detaylı modeli ile render edilir ve performans artışı sağlanır.
  • Culling: Kamera görüş alanı dışındaki nesneleri render etmemize gerek olmayacak şekilde bir oyun planı koyarak performans artışı konusunda gelişme sağlayabiliriz. Occlusion Culling kullanarak performansı artırabiliriz.

Batching Teknikleri

  • Static Batching: Statik (hareketsiz) nesneler için kullanılır. Birçok nesneyi tek bir draw call ile render eder.
  • Dynamic Batching: Dinamik (hareketli) nesneler için kullanılır. Küçük ve benzer nesneleri birleştirerek draw call sayısını azaltır.

3. Fizik ve Çarpışma Optimizasyonu

Rigidbody ve Collider Ayarları

  • Gereksiz yere Rigidbody bileşeni eklemek performans düşüşüne sebep olabilir. Bunun yerine sadece fiziksel etkileşime giren nesnelere eklemek yeterlidir.
  • Mümkünse daha basit Collider türlerini kullanmak oyun performansı ile ilgili bir başka nokta. Basit Collider türlerine Box ve Sphere’i örnek verebiliriz. Bu gibi daha standardize edilmişlerin yerine Mesh Collider kullanmak performansı olumsuz etkileyebilir.

Fizik Simülasyonu

  • Fizik simülasyonu oyunu gerçekçi kılmak için önemli. Ancak, fizik hesaplamaları çoğu zaman yoğun kaynak kullanımı gerektiriyor ve bu da oyun performansını etkiliyor. Bunu önlemek için yapabileceğimiz ilk şey Fixed Timestep değerini ayarlamak. Fizik simülasyonu, her çerçevede değil, belirli zaman aralıklarında güncelleniyor. Bu aralık Fixed Timestep olarak adlandırılıyor ve bunu Edit => Project Settings => Time adımlarından ayarlayabiliriz. Bu değer varsayılan olarak 0.02 (50 FPS) olarak ayarlanmıştır. Bu değeri, oyunumuza ve performans gereksinimlerimize göre ayarlayabiliriz. Daha yüksek bir değer daha az fizik güncellemesi anlamına gelir ve bu da performansı artırabilir, ancak fizik simülasyonunun doğruluğunu azaltabilir.
  • Bir diğer konu fizik katmanları (Physics Layers) ile yapılabilecekler. Fizik katmanları, hangi nesnelerin birbirleriyle çarpışacağını kontrol eder. Gereksiz çarpışma kontrollerini önlemek için bu katmanları kullanabiliriz. Önce Edit => Project Settings => Tags and Layers adımlarından yeni katmanlar oluştururuz. Sonrasında nesneleri Inspector panelinden uygun katmanlara atama yaparız. Son olarak Edit => Project Settings => Physics adımlarından hangi katmanların birbirleriyle çarpışacağını belirleriz. Örneğin, oyuncu ve mermi katmanları arasında çarpışma olabilir, ancak arka plan nesneleriyle mermiler arasında çarpışma olmayabilir. Bu durumda gereksiz olan çarpışmanın arka planda çalışmasına gerek yoktur. Ve tabi performansı düşürmesine de.

4. Bellek Yönetimi

Nesne Havuzlama (Object Pooling)

  • Bu yöntem, sıkça oluşturulan ve yok edilen nesneler için önceden belirli sayıda nesne yaratıp bunları yeniden kullanmayı sağlıyor. Özellikle sürekli olarak yeni nesne oluşturma ve yok etme işlemleri performansı olumsuz etkileyebileceğinden, nesne havuzlama ile bu maliyeti azaltabiliyor ve performansın düşmesini engelleyebiliyoruz. Bunu yaparken dikkat edilmesi gereken birkaç noktaya da değinelim. Havuzun başlangıç boyutunu oyunumuzun ihtiyaçlarına göre iyi belirlememiz önemli. Çok küçük bir havuz, sürekli yeni nesne oluşturulmasına neden olabilir; çok büyük bir havuz ise gereksiz bellek kullanımı anlamına gelir. O zaman yaptığımız işlemin performansa istenen yönde bir etkisi olmaz. Ayrıca nesnelerin durumunu da iyi takip etmeliyiz. Nesneler mutlaka tekrar kullanıma uygun hale getirilmeli. Örneğin, mermiler hedefe ulaştığında veya belirli bir süre geçtikten sonra havuza geri dönmeli. Son olarak da nesneleri havuza iade ederken, bunları devre dışı bırakmayı unutmamamız gerekiyor. Bu, nesnelerin gereksiz yere hesaplama yapmasını engeller.
  • Tekrar tekrar kullanılan nesneleri önbelleğe alarak yeni nesne oluşturma işlemlerinden de kaçınmamız gerekiyor.

Bellek Kullanımı İzleme

  • Unity Profiler ile bellek kullanımını izleyip gereksiz bellek tahsislerini belirleyebiliriz.
  • GC (Garbage Collection) işlemlerini de minimize etmemiz gerekir. Gereksiz bellek tahsisini önleyerek GC’nin devreye girmesini azaltabilirsek, bu da performansa olumlu yönde katkı sağlar.

5. Kod Optimizasyonu

Verimli Kod Yazımı

  • LINQ (Language Integrated Query), veriler üzerinde sorgular yapmayı kolaylaştırıyor ancak performans maliyeti yüksek.Bu sebeple yüksek performans beklediğimiz kısımlarda LINQ yerine klasik döngüleri ve koşulları kullanmak daha avantajlı olabilir.
  • C# dilinde bellek yönetimi, Garbage Collector (GC) tarafından gerçekleştiriliyor. Yeni nesneler oluşturulduğunda bellek tahsis ediliyor ve bu nesneler kullanılmadığında GC tarafından temizleniyor. Ancak, gereksiz bellek tahsisleri ve buna bağlı olarak gereksiz oluşturulan nesnelerin silinmeye çalışılması performansı olumsuz etkileyebilir.

Asenkron İşlemler

  • Async ve Await: Ağ işlemleri veya disk okuma/yazma gibi uzun süren işlemleri asenkron olarak gerçekleştirmek ana oyun döngüsünün kesintisiz çalışmasını sağlar.

Sonuç olarak Unity’de performans optimizasyonu, oyunlarımızın daha akıcı ve verimli çalışmasını sağladığından büyük öneme sahip. Ben de bu makalede performansımızı artırmamıza yardımcı olacak teknikler ve ipuçlarını anlatmaya çalıştım. Bu ipuçlarını uygulayarak, oyuncularımıza daha iyi bir oyun deneyimi sunabileceğimizi umuyorum.

Hepimize iyi kodlamalar.

Teşekkürler.

Selin.

Using Joystick Step by Step with Unity

Unity and Joystick Control

 Hello,

In this article, I will tell you how to control the game with Joystick with Unity. Users prefer to play their games on mobile devices as well as computers and consoles and similar platforms, and writing games that will work on mobile is very popular today. We can use the advantage of the touch screen by adding a joystick to our game screen and make our game preferable.

So how to add Joystick to unity game project? How to control the joystick? How to move a character or object using a joystick? I will explain all of them step by step in my article.

I will start by assuming that you have already created a Unity project and added a character or an object that you want to move with a plane and a joystick to the game scene.

Adding Joystick

Step 1 : Add Collider and Rigidbody to the character we created.

Step 2 : Let’s add the Joystick package offered for free to our project from the link below.

Step 3: After downloading and importing our package using Package Manager, let’s add a Canvas to our project. It doesn’t matter if our project is 2D or 3D, it works in both cases. Because we need a Canvas object to place the joystick on the screen.

Step 4: Then drag and drop the Fixed Joystick from the prefabs folder in the package folders under the Canvas we created in the previous step. Since we have selected the prefab whose position is Fixed by default, the joystick will be placed in the lower left corner of the screen.

Step 5: Since we prefer to use our game on the mobile platform and with the screen tilted, let’s open the Build Settings screen, after adding the scene to the build screen, select IOS or Android and click Switch Platform.

On the Main Screen, where the Scene and Game windows are, Smilator should now be displayed instead of Game.

Step 6: In this step, let’s move on to screen sizing. Let’s change the Scaler property in the Inspector section of the Canvas we added to Scale With Screen Size. Here we can enter the screen sizes we are targeting.

Joystick Control

Step 7: After adjusting the screen sizes, it’s time for the coding part that will allow us to move our character or object. We can add the following codes to the Script file we will create in our Script folder.

 [SerializeField] private FixedJoystick _joystick;
[SerializeField] private float _moveSpeed;

private void FixedUpdate()
{
JoystickMovement();
}

void JoystickMovement()
{
float horizontal = _joystick.Horizontal;
float vertical = _joystick.Vertical;
Vector3 addedPosition = new Vector3(horizontal * _moveSpeed * Time.deltaTime, 0, vertical * _moveSpeed * Time.deltaTime);
transform.position += addedPosition;
}
Object Control with Joystick

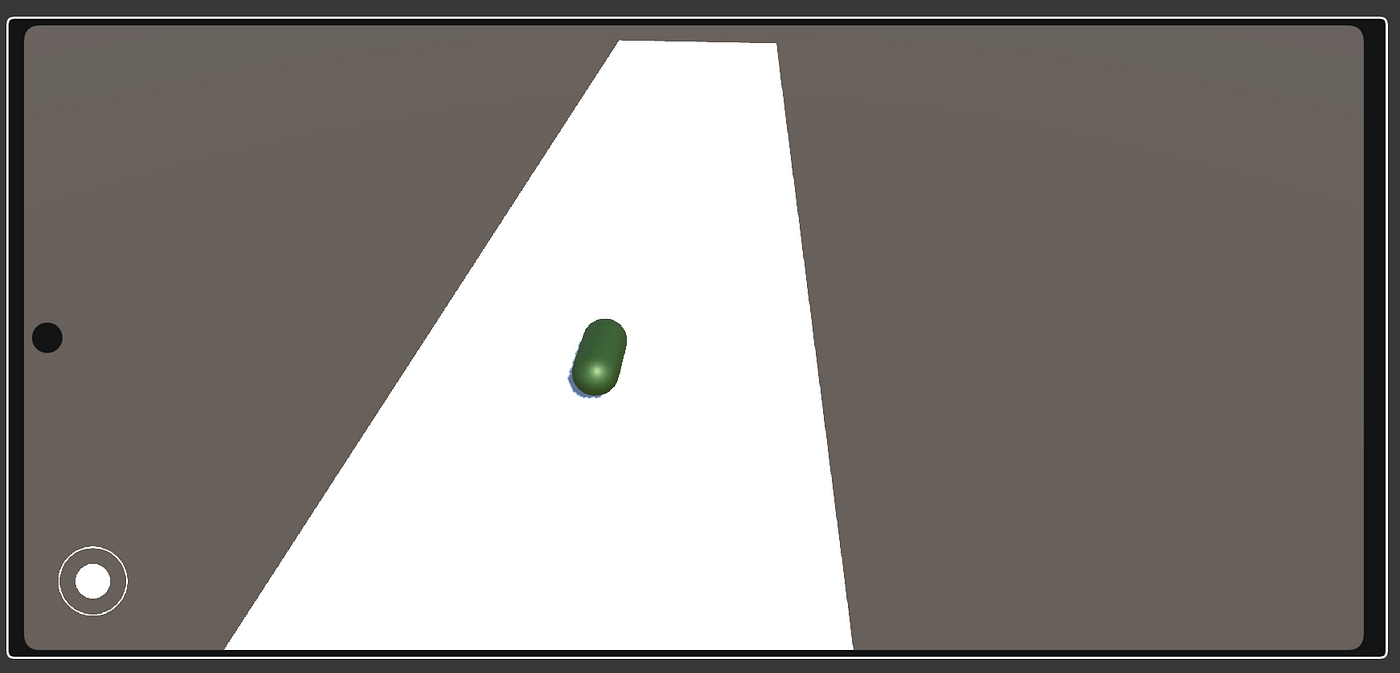
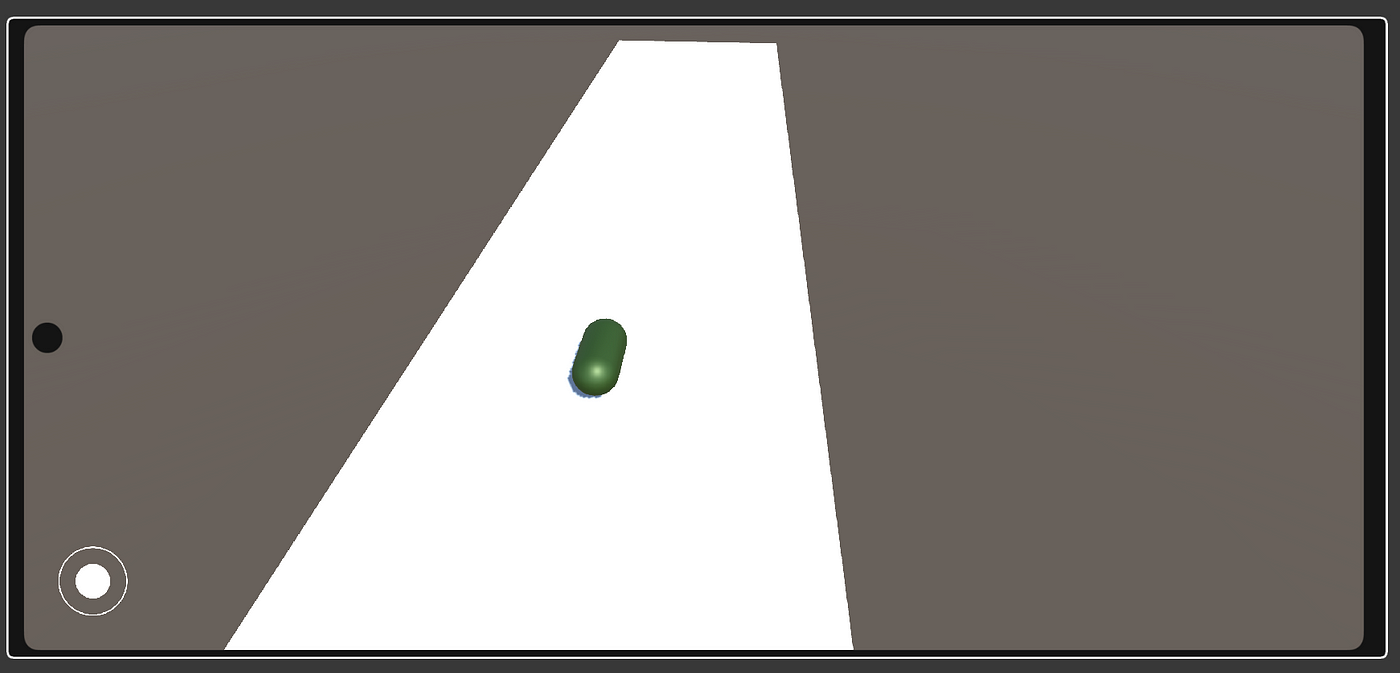
I added a flat floor and a capsule as above for an example. We can think of it as a character. I especially tilted the capsule sideways by playing with its rotation because it already has a rigid body, so it automatically falls to the side as soon as we start the game.

Step 8: Let’s add the Script we wrote above to our character. Let’s not forget to assign our joystick that we added from the package folders to the _joystick variable, which we define as private here but make it accessible with the SerialiseField expression.

I tried to explain step by step how to add a joystick to a game in Unity and how to control it, I hope it was useful.

Thanks for your reading.

Selin.


Unity ile Adım Adım Joystick Kullanımı

Unity ve Joystick Kontrolü

 Merhaba,

Bu yazımda sizlere Unity ile oyunu Joystick ile kontrol etme nasıl yapılır bunu anlatacağım. Kullanıcılar oyunlarını bilgisayar ve konsol ve benzeri platformların yanında mobil cihazlarda da oynamayı çokça tercih ediyorlar ve mobilde çalışacak oyun yazabilmek günümüzde oldukça revaçta. Dokunmatik ekranın avantajını oyun ekranımıza joystick ekleyerek kullanabilir ve oyunumuzun tercih edilir olmasını sağlayabiliriz.

Peki unity oyun projesine Joystick nasıl eklenir? Joystick kontrolü nasıl yapılır? Joystick kullanarak karakter ya da nesne nasıl hareket ettirilir? Hepsini yazımda adım adım anlatacağım.

Halihazırda bir Unity projesi oluşturduğunuzu, bir zemin(plane) ve joystick ile hareket etmesini istediğiniz bir karakter veya bir nesneyi oyun sahnesine eklediğinizi varsayarak anlatmaya başlıyorum.

Joystick Ekleme

1 . Adım : Oluşturduğumuz karaktere Collider ve Rigidbody ekleyelim.

2 . Adım : Ücretsiz bir şekilde sunulan Joystick paketini aşağıdaki linkten projemize ekleyelim.

3 . Adım: Package Manager kullanarak paketimizi sırasıyla download ve import ettikten sonra projemize bir Canvas ekleyelim. Projemizin 2D veya 3D olması önemli değil, her iki durumda da çalışır. Çünkü Joystick’i ekrana yerleştirmek için bir Canvas nesnesine ihtiyacımız var.

4 . Adım: Daha sonra paket klasörleri içerisindeki prefabs klasöründen Fixed Joystick’i bir önceki adımda oluşturduğumuz Canvas’ın altına sürükleyerek bırakalım. Pozisyonu default olarak Fixed belirlenen prefab’ı seçtiğimiz için joystick ekranın sol alt köşesine yerleşecek.

5. Adım: Oyunumuzu mobil platformda ve ekran yana yatıkken kullanmayı tercih ettiğimiz için Build Settings ekranını açalım, Sahneyi build ekranına ekledikten sonra IOS veya Android’i seçerek Switch Platform’a tıklayalım.

Ana Ekranda Scene ve Game pencerelerinin olduğu kısımda artık Game yerine Smilator görüntüleniyor olması gerekir.

6 . Adım: Bu adımda ekran boyutlamasına geçelim. Eklediğimiz Canvas’ın Inspector kısmındaki Scaler özelliğini Scale With Screen Size olarak değiştirelim. Burada hedeflediğimiz ekran boyutlarını girebiliriz.

Joystick Kontrolü

7 . Adım: Ekran boyutlarını da ayarladıktan sonra sıra karakterimizi veya nesnemizi hareket ettirmemizi sağlayacak kodlama kısmına geldi. Script klasörümüz içerisine oluşturacağımız Script dosyasına aşağıdaki kodları ekleyebiliriz.


[SerializeField] private FixedJoystick _joystick;
[SerializeField] private float _moveSpeed;

private void FixedUpdate()
{
JoystickMovement();
}

void JoystickMovement()
{
float horizontal = _joystick.Horizontal;
float vertical = _joystick.Vertical;
Vector3 addedPosition = new Vector3(horizontal * _moveSpeed * Time.deltaTime, 0, vertical * _moveSpeed * Time.deltaTime);
transform.position += addedPosition;
}
Joystick ile Nesne Kontrolü

Ben örnek olması için yukarıdaki gibi düz bir zemin ve bir kapsül ekledim. Bunu karakter gibi düşünebiliriz. Kapsülü rotation’ı ile oynayarak özellikle yan yatırdım çünkü rigidbody’si bulunduğundan zaten oyunu başlattığımız an kendiliğinden yana düşüyor.

8 . Adım: Yukarıda yazmış olduğumuz Script’i karakterimize ekleyelim. Burada private olarak tanımladığımız ancak SerializeField ifadesiyle erişilebilir olmasını sağladığımız _joystick değişkenine paket klasörlerinden eklediğimiz joystick’imizi atamayı unutmayalım.

Unity’de bir oyuna Joystick nasıl eklenir ve nasıl kontrol edilir bunu adım adım anlatmaya çalıştım, umarım faydalı olmuştur.

Teşekkürler.

Selin.