Hello,
This week I am starting the Git and Github series. In my first article, I will define basic commands and terminology. In the following articles, I will cover advanced git commands and GitHub Desktop operations.
Git & GitHub & GitHub Desktop

Git is a version control system.
GitHub is where we store our code and collaborate with others. It serves to store open source code. It allows two different codes of a project to be merged.
GitHub Desktop helps us work with GitHub locally.
Why should we use GitHub?
- The most widely used version control system in the world.
- It is free for individual users and cheap for teams and companies.
- We can follow software developers on the platform, make comments and bug reports on open source developed codes.
- Thanks to forking, we can contribute to the development of open source codes.
GitHub Terminology
- Repository: We can liken it to a folder or repository. It contains all the files of the project and the revision history of each file.
- Branch: The version of the project separated from the main work. If we think of the main project as a tree trunk, we can liken the branch, which is the side version, to the branch or branches of the tree. A project can have more than one branch.

- Fork: A copy of a repository in a github account. It allows us to freely experiment with changes without affecting the original project. We can fork any public repository on our computer.
- Clone: The process of copying a repository on GitHub to the local computer.
- Main/Master: The main branch of a repository. In older GitHub versions it is called master, in newer versions it is called main.
- Pull: The process of withdrawing all or a certain part of a repository to a computer (local).
- Push: Sending the changes made in the project files to the github servers.
- Merge: Merging a branch on a repository with another branch. Conflict may occur at the end of the process.
- Conflict: Conflict when merging two branches. Such as different codes written on the same lines. Some of them GitHub resolves automatically, some need to be resolved manually.
- Pull Request: GitHub’s way of notifying interested parties about your request to include your changes in the relevant branch.
- Stash: Keeping the changes made while navigating between two branches without committing, storing them, and recalling them when necessary.
- Discard: Deleting changes made while navigating between two branches.
- Remote: Assets, files, etc. on GitHub servers.
- Local: Entities within our local computer.
Simple Commands
git clone repository url : written to copy a repository from remote to local
git remote add origin repository url : to synchronise a remote repository with the local repo.
git push -u origin main : after the change, we write it so that we can resend it to remote.
If there is a modified repo in remote (it may have been modified on another computer or GitHub page), we use fetch and pull commands to pull it to local.
git fetch : pulls the changes from remote but does not show it in local files, it just writes it into a hidden git file.
git pull : We execute this command so that it is also reflected in the local files.
git branch -a : lists all branches, both remote and local.
git branch : lists only the branches located locally.
git checkout -b branchname : creates a new branch and switches to this branch with a single command.
git checkout branchname : switches to the existing branch whose name is written in the command.
git add . / git add -A : allows to index all files.
git add filename : only indexes the named file.
git commit -m “message” : It is used to upload the files added to the directory or those that have been modified to the local repository. Since the added message will appear on the screen where the commits are listed, it is important to write the information about what kind of change was made in this field so that it can be understood correctly when the project is examined later.
git push -u origin branchname : Adds the named branch opened in local to remote. Now main and the named branch appear separately in remote. After this stage, if desired, this branch and main can be merge.Açılan yeni branch’ta yapılan değişiklikleri main/master’a taşıma mergekomutu ile yapılır. Branch’ı main’e taşıyabilmek için:
- git checkout main : switches to main.
- git merge origin/branch name hosting the change : moves commits added to branch to main.
- git push : The process is completed by sending the latest version to GitHub.
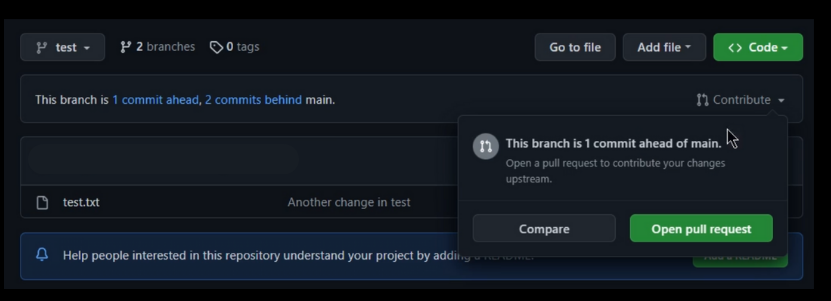
- Merge can alternatively be done in the GitHub interface. Suppose we made a change in the branch and committed this change to GitHub. When the relevant branch is selected on the GitHub page, the following screen appears.

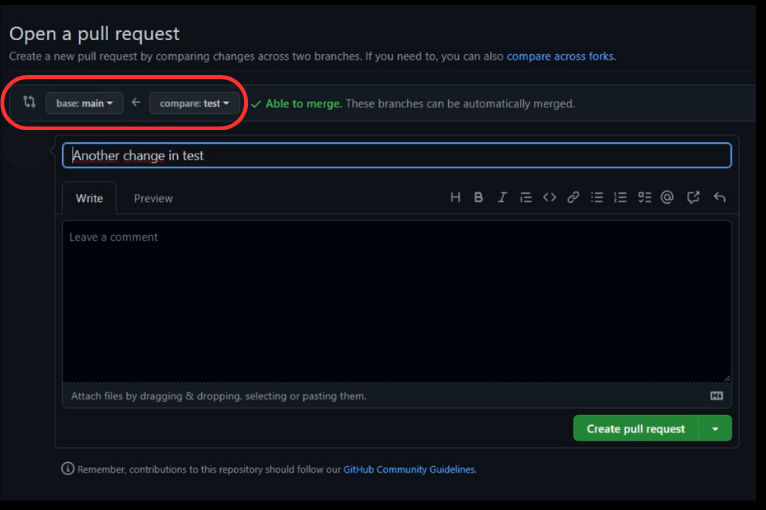
The warning at the top means that branch is 1 commit ahead of main. Here, when we click the “Open pull request” button, the first thing we will pay attention to on the screen that appears is the base and compare fields.

Since we want to add the changes made in the branch to main, it should be base: main and compare: branch.
When we click the “Create pull request” button by adding a description, if there is no conflict between branch and main, the “Merge pull request” button becomes active. Click “Confirm merge” by adding a new description. With this, both sections are synchronised. After this stage, the branch can be deleted if desired. We can do this with the “Delete branch” button on the same page.
NOT: Since this merge operation using the GitHub interface is done remotely, no changes are displayed in the local files. In order to do this, we need to pull the latest state of the project to our computer with the git pull command.
One of the reasons for conflict is that different codes are written on the same line number of the same file in different branches.
Changes are committed and pushed separately in both branches. Afterwards, when we switch to main and want to merge as I described above, we get an error telling us that conflict occurs, automatic correction cannot be done, conflicts should be committed after they are corrected. When we return to the IDE we are using (Visual Studio Code, Atom, etc.), options about which lines conflict occurred and what can be done about it appear.

- Accept Current Change
- Accept Incoming Change
- Apply Both Changes
- Compare Changes
After selecting which one we want to apply (one of the first 3 options), we can perform the commit & push operation. The relevant change is made in Main. Nothing changes in the other branch. If we come to the branch and do the same merge operation here (reverse merge), the two branches will be merged successfully since there will be no conflict with the current version of the main file.
git stash : storing a change without committing it, keeping it in local memory. When is it used? Let’s say there are parts of code that don’t work in our file. At the same time, working changes will come from another branch. Before merging these changes with our file, we hide the non-working parts with stash. We get the changes coming from the other branch with mergeand then with git stash pop, we bring back our codes that we keep temporarily in local memory. With git stash apply, we both assign our codes to local memory and keep them visible.
git restore . : deletes all uncommitted or unstashed changes.
git reset --hard : Returns to the last commit, deletes all other changes, but the changes stored with stash continue to be kept in memory. In other words, when we run the git stash apply command, the stored changes come back. This command is valid for changes made before commit. Even if it is not pushed, the committed changes are kept in the record.
git revert commit id : A very long commit id is created in every commit operation we do. We can see this with the git log command or from the screen where commits are listed in the GitHub interface. When we run the revert command with this id, our project returns to the moment that commit was made. But while doing this, it does not delete the changes made in the meantime, instead it creates a new commit with a reverse change and returns it back to the relevant commit. And when we open the log screen again, we see that the message of the last commit starts with the REVERTkeyword.
That’s all the information from our Git series. I would be very pleased if you support me by reading my articles for more. I hope it will be useful.
Thank you for your reading.
Selin.
Hiç yorum yok:
Yorum Gönder