Firebase Integration with Flutter


Hello,
In this article, I want to talk about how we can integrate our Flutter project into the Firebase platform.

Firebase is a platform offered by Google and includes comprehensive developer tools that enable rapid development and deployment of mobile and web applications.

Firestore Integration Step by Step

1. Firstly, we need to add our project that we have written or just started to Firestore. For this, we log in to Firebase Console. We log in with our Google account.

2. When we enter the Get Started section, click on the Add Project section on the page that opens.

3. On the screen that opens, we enter our project name and proceed as the page directs us. There is a selection to use GoogleAnalytics. This is a free web analytics service used to measure the performance and user interactions of websites and mobile applications. You can select it if you want to track and access real-time data such as visitor tracking, page views, accesses, traffic sources, etc. The next screen asks you to create an Analytics account. You can create and continue. If you do not want to use this feature, you can also leave it unchecked.

4. After our project connection is made, we see a screen like below. Here we need to make IOS, Android, Web integrations separately. Of course, it is logical to choose only on which of these platforms our application will be published.

5. Let’s start with IOS. Our screen looks like this:

The first information requested from us is Apple bundle id. This is like the identity record of our application. It can be determined by the system when creating a project, or we can ask for a specific id. We can access this information by opening our project in XCode. After the project is loaded, when we click the Runner tab, the General page is loaded on the right. The bundle id is there as shown below. Other information NickName and StoreID are optional.

6. The second part is downloading the configuration file. We download the file created specifically for our project from the link as shown on the screen below. And add it under the project folders. We do this addition on Xcode, not by finding the project folders in the Finder and transferring them into it.

When we drag the file to the XCode screen, a screen like the one below appears. It is important that we select all targets on this screen.

7. In the next step, we need to install firebase-ios-sdk in our project. A URL appears on the screen below, copy it and paste the URL from the File — Add Package Dependencies steps in Xcode and click Add Package.

8. After this stage, our project is saved in the Firestore database on the IOS platform.

9. On the Android platform, there are a number of different applications.

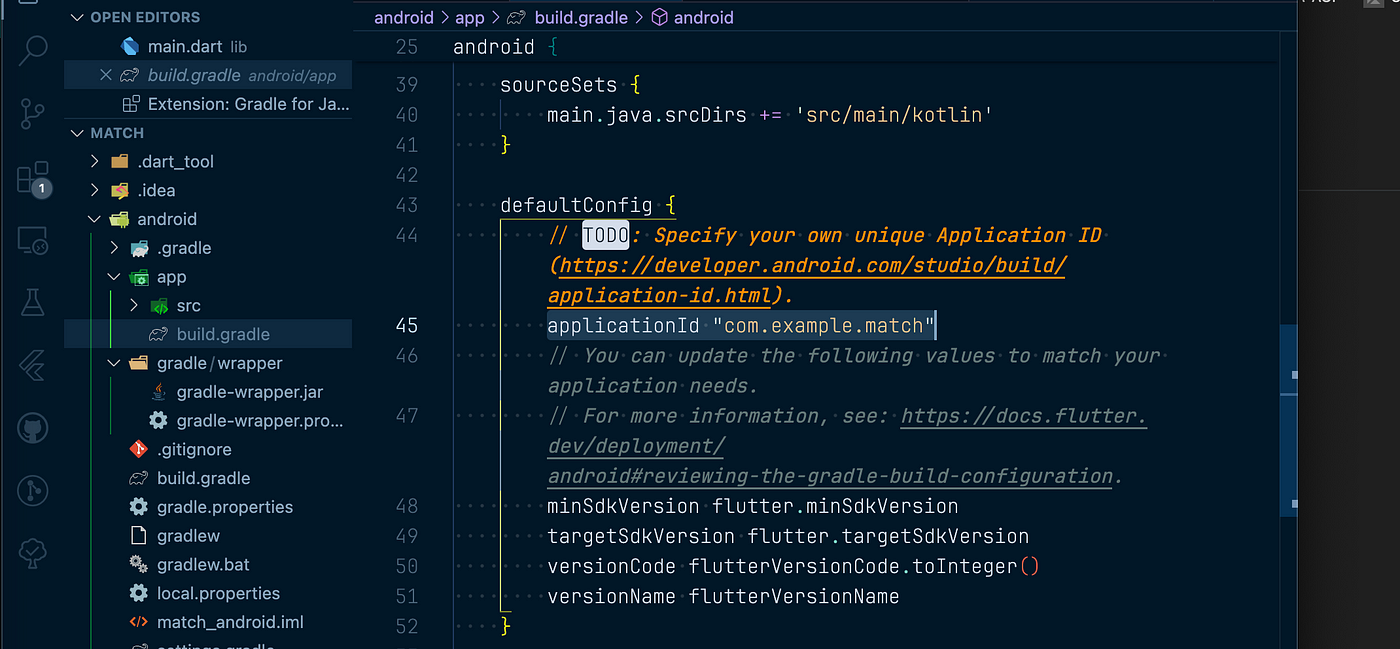
The first requested information is Android package name. It has the same feature as IOS bundle id.

10. Here, a json file comes as a configuration file. We add it under the app folder from the project folders as shown.

11. It’s time to add firebase-sdk. We enter the android/app/build.gradle file and add the following codes:

plugins {
id "com.android.application"
id "kotlin-android"
id "dev.flutter.flutter-gradle-plugin"
id "com.google.gms.google-services". //This line is added
}

dependencies {
implementation platform('com.google.firebase:firebase-bom:32.8.1')
//This line is added, figures may vary according to version.
//The current figures are shown in the following routing screen.

In the android/build.gradle file, we add the following codes:

buildscript {.  //figures may vary according to version. 
//The current figures are shown in the following routing screen.
ext.kotlin_version = '1.7.10'
repositories {
google()
mavenCentral()
}

dependencies {
classpath 'com.android.tools.build:gradle:7.3.0'
classpath "org.jetbrains.kotlin:kotlin-gradle-plugin:$kotlin_version"
classpath 'com.google.gms:google-services:4.4.1'
}
}

12. After completing this step, we also register our project for the Android platform.

Firebase Key Features

1. Database (Firestore): Firebase provides Firestore, a real-time database solution. Firestore is a cloud-based, NoSQL database and is an ideal solution for storage and synchronisation of user data for web and mobile applications.

2. Authentication: Firebase Authentication manages authentication of application users. It facilitates authentication of users using email/password, Google, Facebook, Twitter, GitHub and other identity providers.

3. Storage: Firebase Storage allows users to store media files (images, videos, documents) in the cloud. In this way, users can securely store and share large files.

4. Analytics and Monitoring: Firebase Analytics, as I mentioned at the beginning of my article, offers comprehensive analytical tools to monitor and understand application usage. It monitors user behaviour and interactions and measures the performance of the application.

5. Messaging and Notifications: Firebase Cloud Messaging (FCM) is used to send push notifications to users. FCM is a powerful tool used to attract and engage users.

6. Hosting: Firebase Hosting is used to deploy web applications quickly and securely. It offers static and dynamic content and servers it securely with SSL support.

7. Artificial Intelligence and Machine Learning: Firebase ML Kit allows developers to add artificial intelligence and machine learning features in their applications. It can enrich applications with advanced image processing, text recognition, language translation and other features.

We can use Firebase with the services I mentioned above and many more tools that are not here. I will explain the most used Firestore and Storage features in detail in my following articles.

I hope my installation narrative helps.

Thanks for reading.

Selin.

Flutter ile Firebase Kurulumu


Merhaba,

Bu yazımda Flutter projemizi Firebase platformuna nasıl entegre edebileceğimizden bahsetmek istiyorum.

Firebase, Google tarafından sunulan bir platformdur ve mobil ve web uygulamalarının hızlı bir şekilde geliştirilmesini ve dağıtılmasını sağlayan kapsamlı geliştirici araçları içerir.

Adım Adım Firestore Entegrasyonu

  1. İlk olarak yazmış olduğumuz veya henüz başlattığımız projemizi Firestore’a eklememiz gerekiyor. Bunun için Firebase Console’a giriş yapıyoruz. Google hesabımızla oturum açıyoruz.
  2. Get Started kısmından girdiğimizde açılan sayfada Add Project bölümüne tıklıyoruz.

3. Açılan ekranda proje ismimizi girerek sayfanın bizi yönlendirdiği şekilde ilerletiyoruz. GoogleAnalytics’in kullanılması yönünde bir seçim geliyor. Bu web sitelerinin ve mobil uygulamaların performansını ve kullanıcı etkileşimlerini ölçmek için kullanılan ücretsiz bir web analitiği hizmeti. Ziyaretçi takibi, sayfa görüntüleme, erişimler, trafik kaynakları gibi gerçek zamanlı verileri takip etmek ve ulaşmak isterseniz bunu seçebilirsiniz. Bir sonraki ekranda sizden Analytics hesabı oluşturmanızı bekler. Oluşturup devam edebilirsiniz. Bu özelliği kullanmak istemezseniz işaretlemeden de geçebilirsiniz.

4. Proje bağlantımız yapıldıktan sonra aşağıdaki gibi bir ekran karşımıza geliyor. Burada IOS, Android, Web entegrasyonlarını ayrı ayrı yapmamız gerekiyor. Uygulamamız bu platformlardan hangisinde yayınlanacaksa sadece onu seçmemiz elbette ki mantıklı olan.

5. IOS ile başlayalım. Ekranımız şu şekilde:

Bizden istenen ilk bilgi Apple bundle id. Bu uygulamamızın kimlik kaydı gibi bir bilgi. Proje oluştururken sistem tarafından belirlenebilir ya da biz de belirli bir id verilmesini isteyebiliriz. Bu bilgiye projemizi XCode’da açarak erişebiliriz. Proje yüklendikten sonra Runner sekmesine tıkladığımızda sağda General sayfası yüklenir. Aşağıda göründüğü gibi bundle id orada yer alır. Diğer bilgiler NickName ve StoreID opsiyonel.

6. İkinci bölüm configürasyon dosyasını indirme. Aşağıdaki ekranda gösterildiği şekilde projemize özel oluşturulmuş dosyayı linkten indiriyoruz. Ve proje klasörleri altına ekliyoruz. Bu eklemeyi proje klasörlerini Finder’da bularak içerisine aktarma şeklinde değil, Xcode üzerinde yapıyoruz.

Dosyayı XCode ekranına sürüklediğimizde aşağıdaki gibi bir ekran çıkıyor. Bu ekranda tüm target’ları seçmemiz önemli.

7. Bir sonraki adımda projemize firebase-ios-sdk yüklemesi yapmamız gerekiyor. Aşağıda görüntüsü bulunan ekranda bir URL çıkıyor, onu kopyalayıp Xcode’da File — Add Package Dependencies adımlarından URL’yi çıkan ekrana yapıştırıp Add Package’a tıklıyoruz.

8. Bu aşamadan sonra projemiz Firestore veritabanına IOS platformunda kaydedilmiş oluyor.

9. Android platformunda ise birkaç farklı uygulama mevcut.

İlk istenen bilgi Android package name. IOS bundle id ile aynı özelliği taşıyor.

10. Burada da konfigürasyon dosyası olarak bir json dosyası geliyor. Onu da gösterildiği şekilde proje klasörlerinden app klasörünün altına ekliyoruz.

11. Sıra firebase-sdk’yı eklemeye geliyor. android/app/build.gradle dosyasına girerek aşağıdaki kodları ekliyoruz:

plugins {
id "com.android.application"
id "kotlin-android"
id "dev.flutter.flutter-gradle-plugin"
id "com.google.gms.google-services". //Bu satır ekleniyor
}

dependencies {
implementation platform('com.google.firebase:firebase-bom:32.8.1')
//bu satır ekleniyor, rakamlar versiyonuna göre değişiklik gösterebilir.
//güncel rakamlar aşağıdaki yönlendirme ekranında yer alır.

android/build.gradle dosyasında ise şu kodları ekliyoruz:

buildscript {.  //rakam kısımları güncel versiyona göre değişebilir, 
//güncel rakamlar aşağıdaki yönlendirme ekranında yer alır.
ext.kotlin_version = '1.7.10'
repositories {
google()
mavenCentral()
}

dependencies {
classpath 'com.android.tools.build:gradle:7.3.0'
classpath "org.jetbrains.kotlin:kotlin-gradle-plugin:$kotlin_version"
classpath 'com.google.gms:google-services:4.4.1'
}
}

12. Bu adımı da tamamladıktan sonra projemizi Android platformu için de kaydetmiş oluyoruz.

Firebase Temel Özellikleri

  1. Veritabanı (Firestore): Firebase, gerçek zamanlı veritabanı çözümü olan Firestore’u sağlar. Firestore, bulut tabanlı, NoSQL bir veritabanıdır ve web ve mobil uygulamalar için kullanıcı verilerinin depolanması ve senkronizasyonu için ideal bir çözümdür.
  2. Kimlik Doğrulama: Firebase Authentication, uygulama kullanıcılarının kimlik doğrulamasını yönetir. E-posta/şifre, Google, Facebook, Twitter, GitHub ve diğer kimlik sağlayıcılarını kullanarak kullanıcıların kimlik doğrulamasını kolaylaştırır.
  3. Depolama: Firebase Storage, kullanıcıların medya dosyalarını (resimler, videolar, belgeler) bulutta saklamalarını sağlar. Bu sayede kullanıcılar büyük dosyaları güvenli bir şekilde depolayabilir ve paylaşabilirler.
  4. Analiz ve İzleme: Firebase Analytics, yazımın başında da bahsettiğim gibi uygulama kullanımını izlemek ve anlamak için kapsamlı analitik araçlar sunar. Kullanıcı davranışlarını ve etkileşimlerini izler ve uygulamanın performansını ölçer.
  5. Mesajlaşma ve Bildirimler: Firebase Cloud Messaging (FCM), kullanıcılara anlık bildirimler göndermek için kullanılır. FCM, kullanıcıları geri çekmek ve etkileşim sağlamak için kullanılan güçlü bir araçtır.
  6. Hosting: Firebase Hosting, web uygulamalarını hızlı ve güvenli bir şekilde dağıtmak için kullanılır. Statik ve dinamik içerikleri sunar ve SSL desteği ile güvenli bir şekilde sunucular.
  7. Yapay Zeka ve Makine Öğrenimi: Firebase ML Kit, geliştiricilere uygulamalarında yapay zeka ve makine öğrenimi özellikleri eklemelerine olanak tanır. Gelişmiş görüntü işleme, metin tanıma, dil çevirisi ve diğer özelliklerle uygulamaları zenginleştirebilir.

Firebase’i yukarıda saydığım hizmetler ve burda olmayan çok daha fazla araç ile kullanabiliriz. Bunlardan en çok kullanılan Firestore ve Storage özelliklerini ilerleyen yazılarımda detaylı anlatacağım.

Umarım kurulum anlatımım yardımcı olur.

Teşekkürler.

Selin.